One of the most popular triggers provided by AutomateIt is the Location Trigger. Although defining such triggers is very intuitive, still there might be some tips and tricks that can make it even better.
This chapter will walk you through the basic settings of a common location trigger, emphasizing some features that could help you get the best out of this trigger.
Location Trigger Configuration
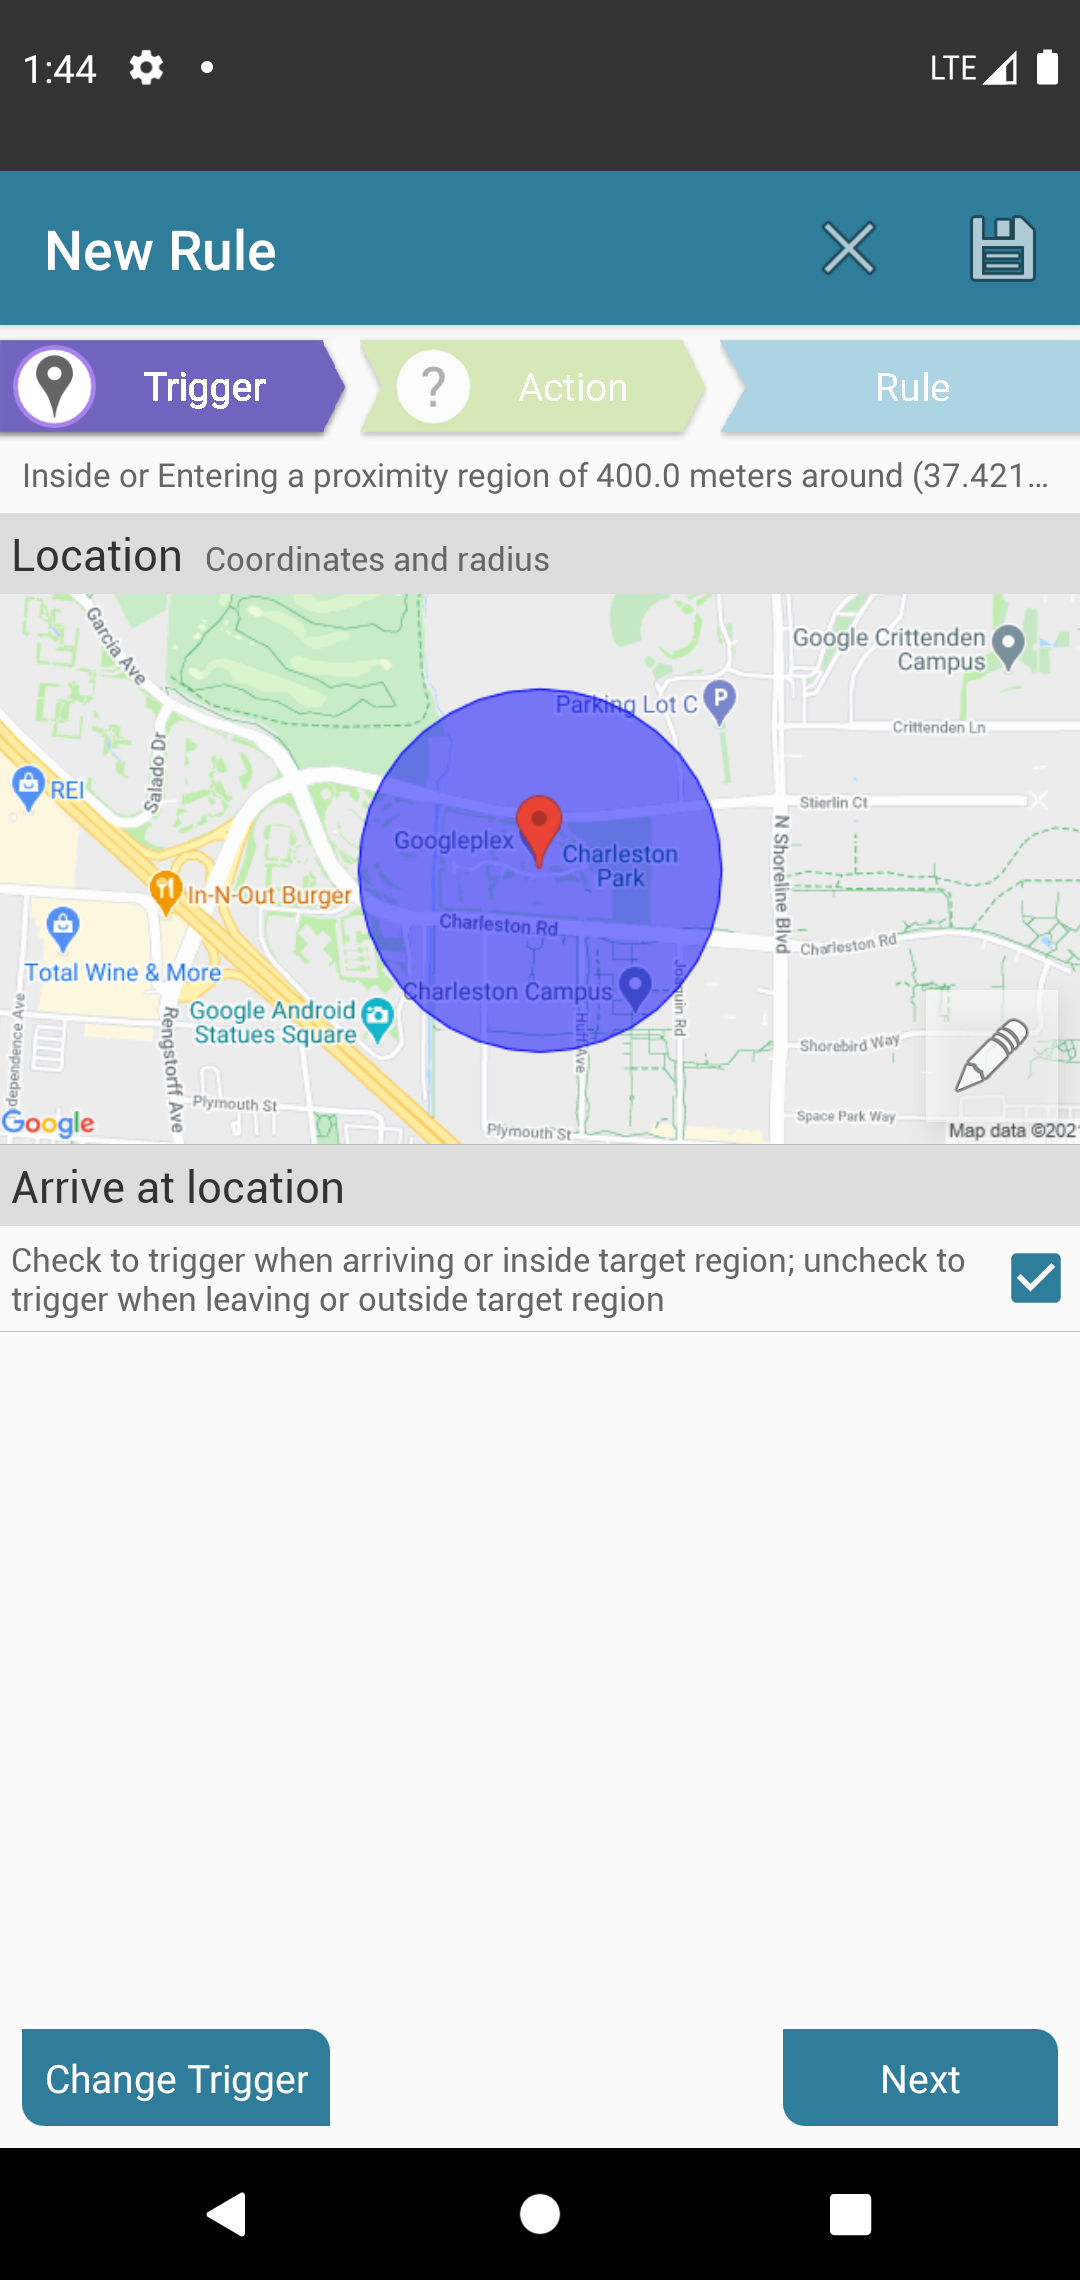
The trigger configuration screen has the following parameters:When configuring a new trigger, AutomateIt takes the device current location and shows it on the map. That represents the location that will be used to launch the trigger.
To edit the location, tap the  icon on the bottom-right of the map
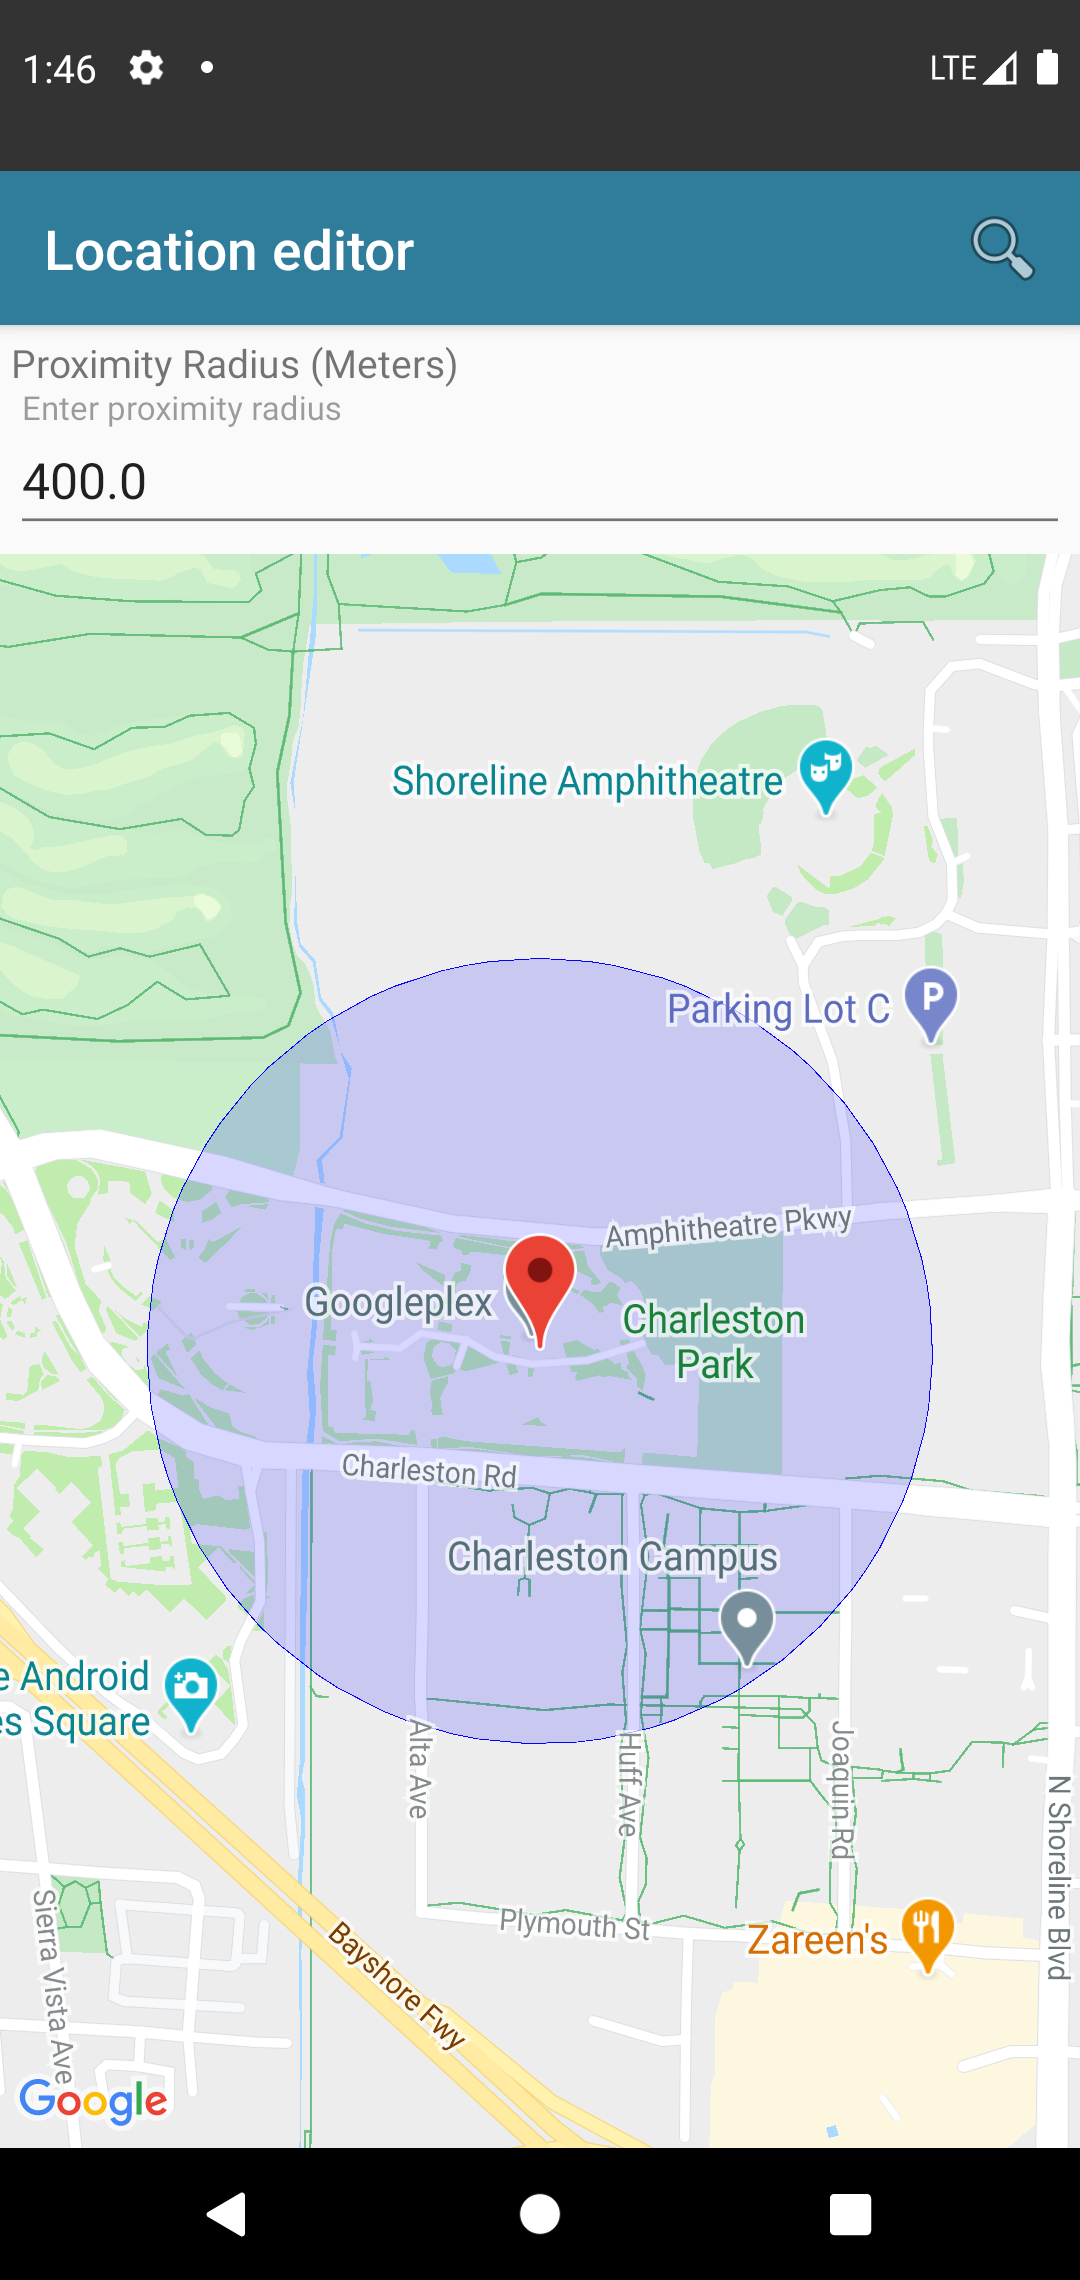
area, which will show a full screen map editor:
Select a location by tapping the map, and configure the trigger radius as desired.
Tapping the "back" button of your Android device will set the trigger location to the latest location selected on the map.
Now you can choose whether the trigger should launch upon entry or exit from the configured location and radius.
You
do
that by setting the Arrive to location checkbox.
Location Trigger History
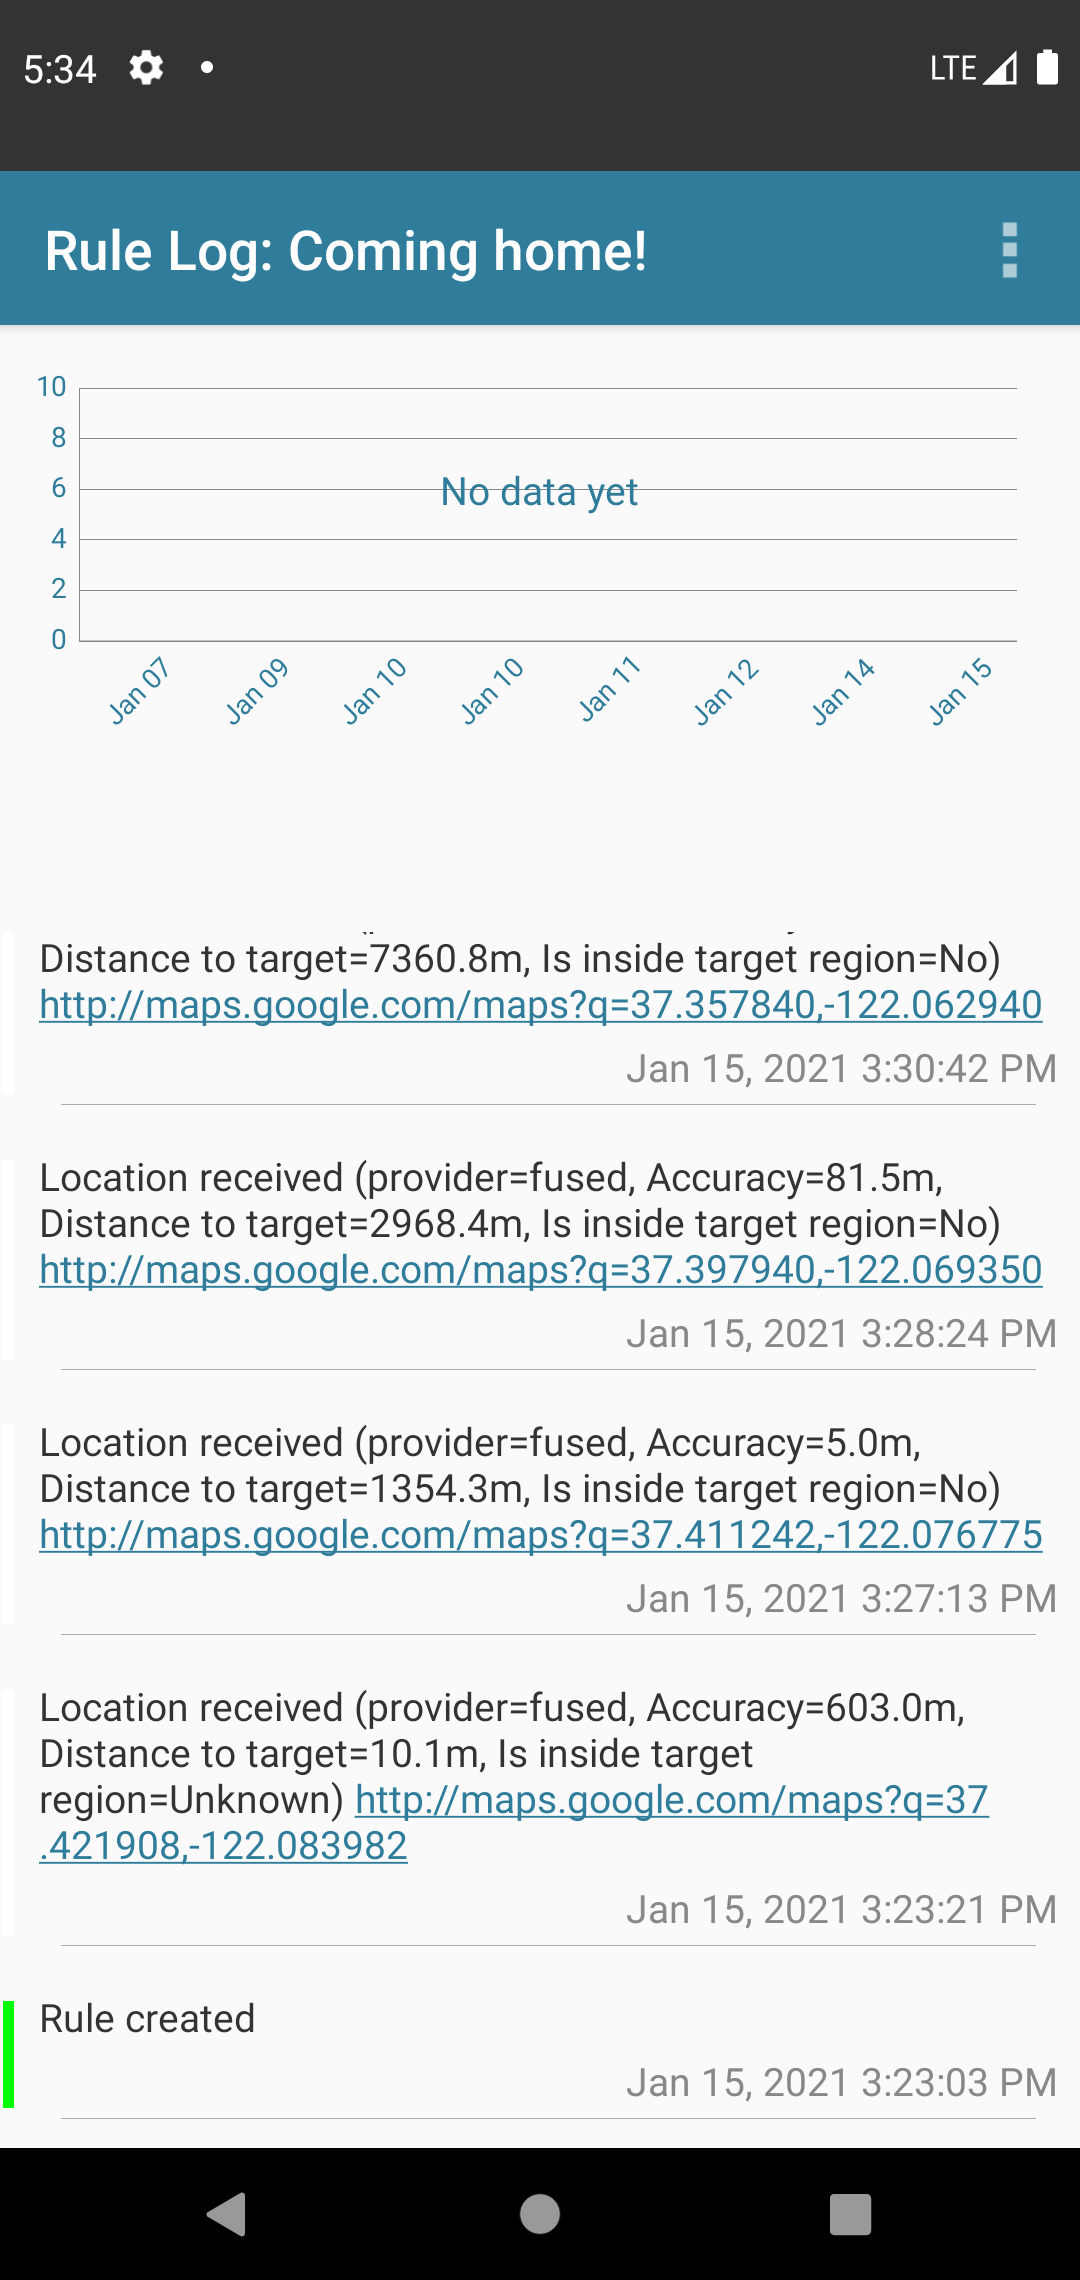
Rules with location triggers have a more detailed history log than all other triggers:This log shows the recent events for the rule "Coming home!". You can see that for each received location the log shows the accuracy and distance from target location and if it is inside target region (Yes, No or Unknown).
Another Interesting feature is that once a location is received, you can click on the hyperlink (the coordinates on the screenshot are smudged) and show it on Maps application or using the Browser.
This log can be very useful to better understand and fine-tune your location triggers since it shows you, each location received, level of accuracy and the distance to your defined location.
This feature is available on AutomateIt Pro or by unlocking it on AutomateIt Free
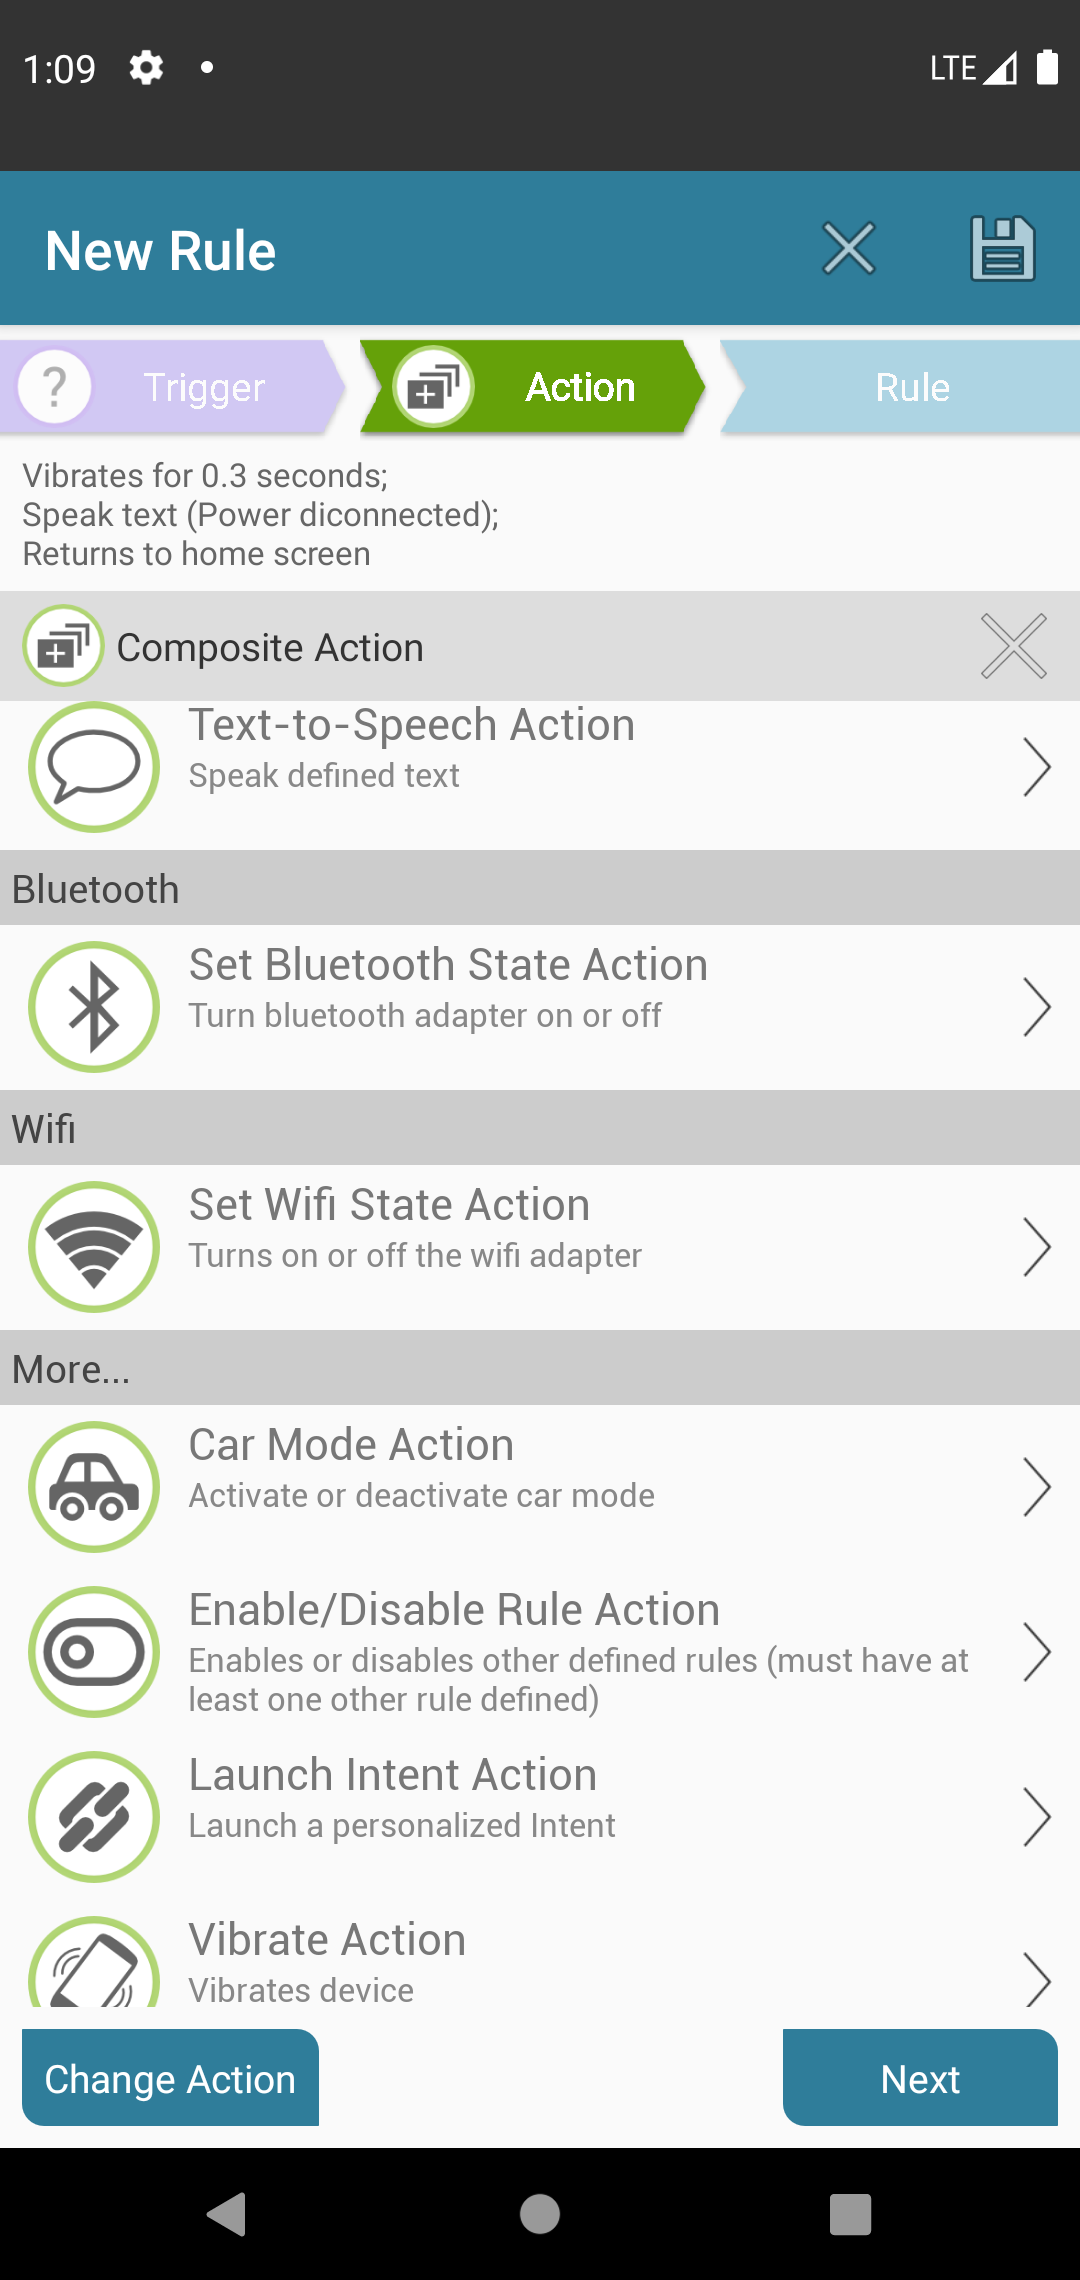
AutomateIt supports creating rules with composite actions and/or composite triggers. By using composite action a rule will execute several actions one by one.
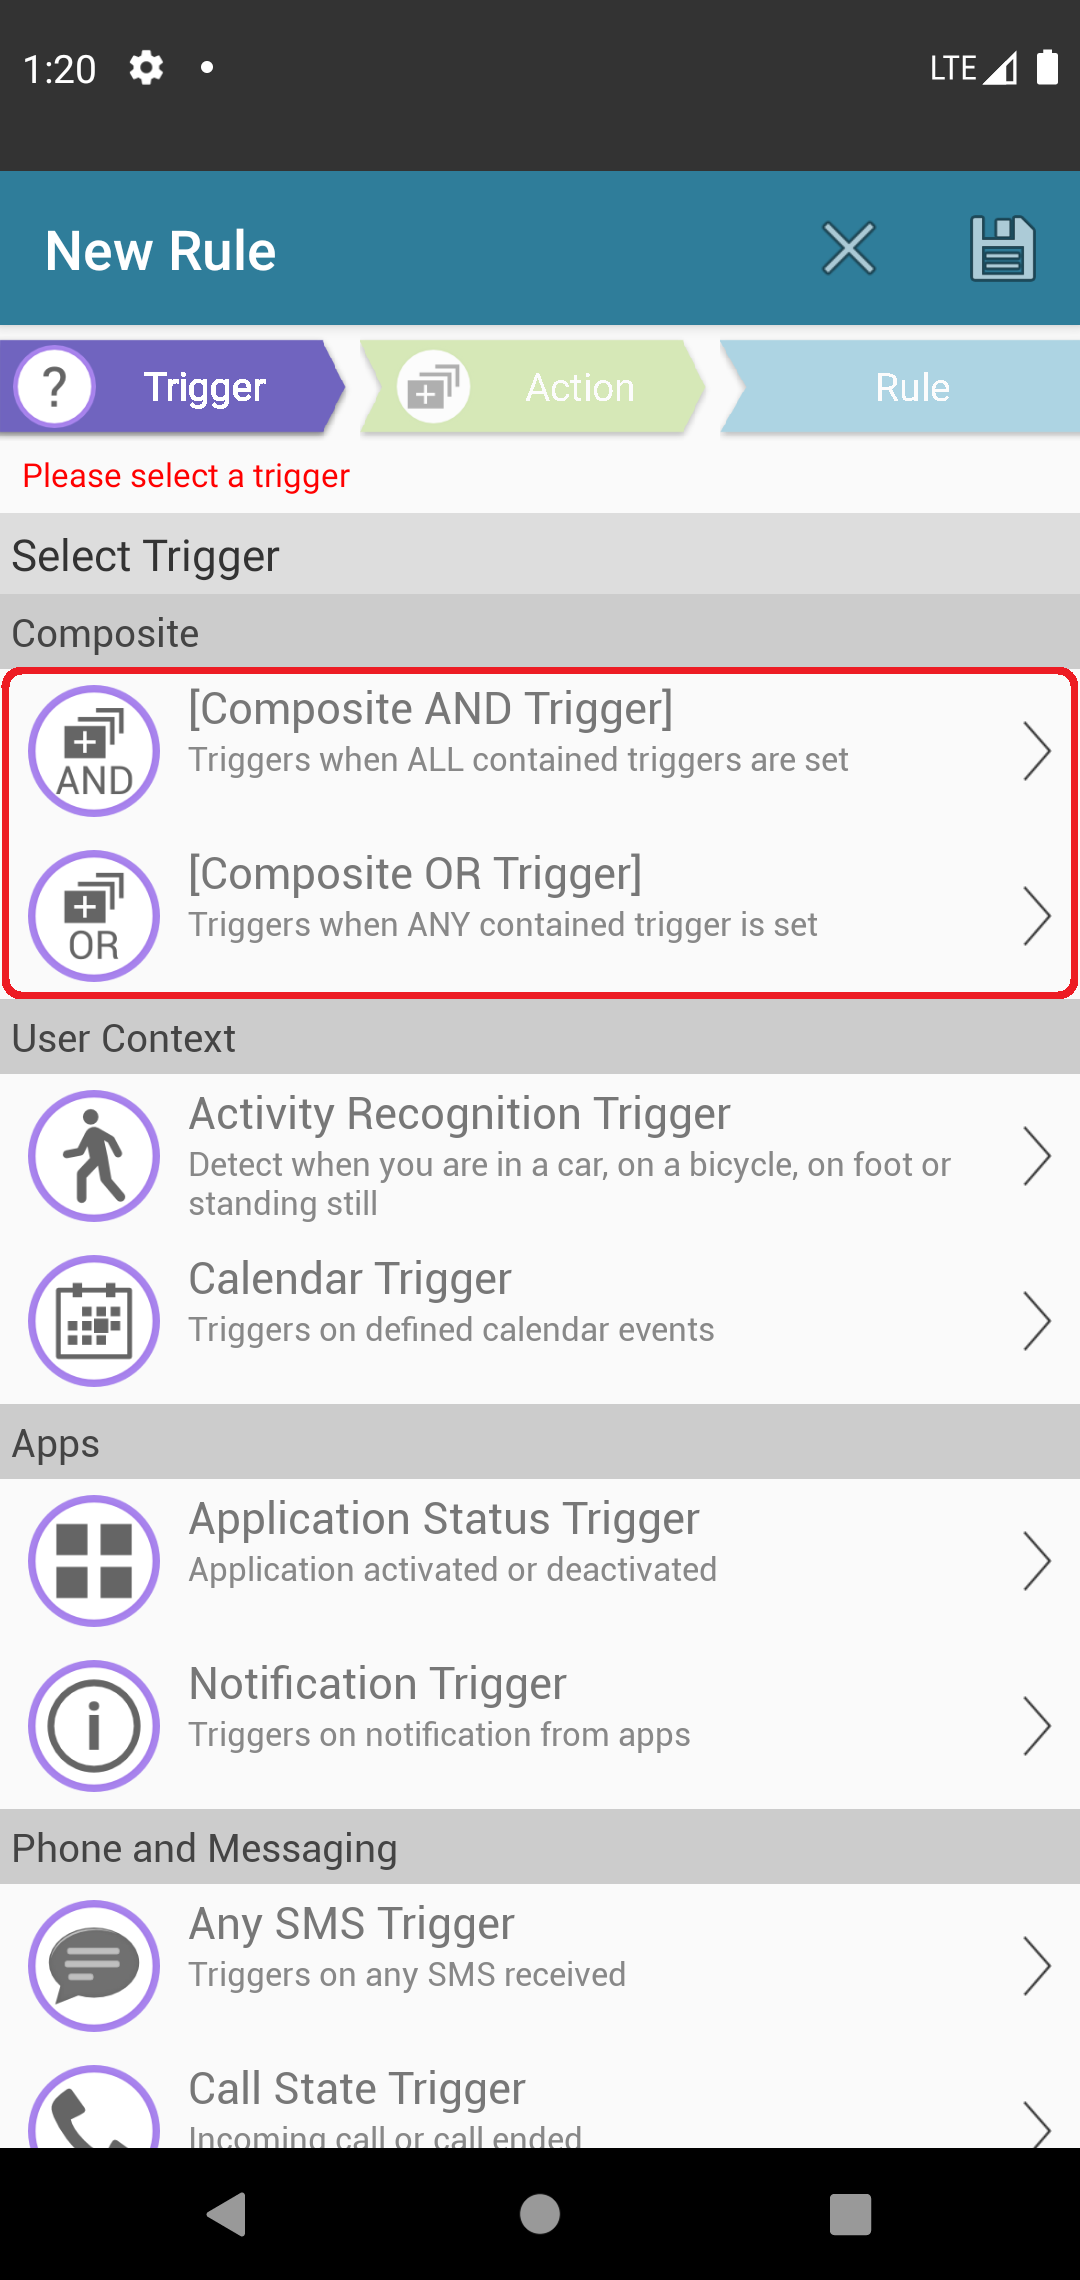
When using composite triggers AutomateIt allows you to choose using an AND composite trigger, an OR composite trigger or create a hierarchy between them.
Composite Action
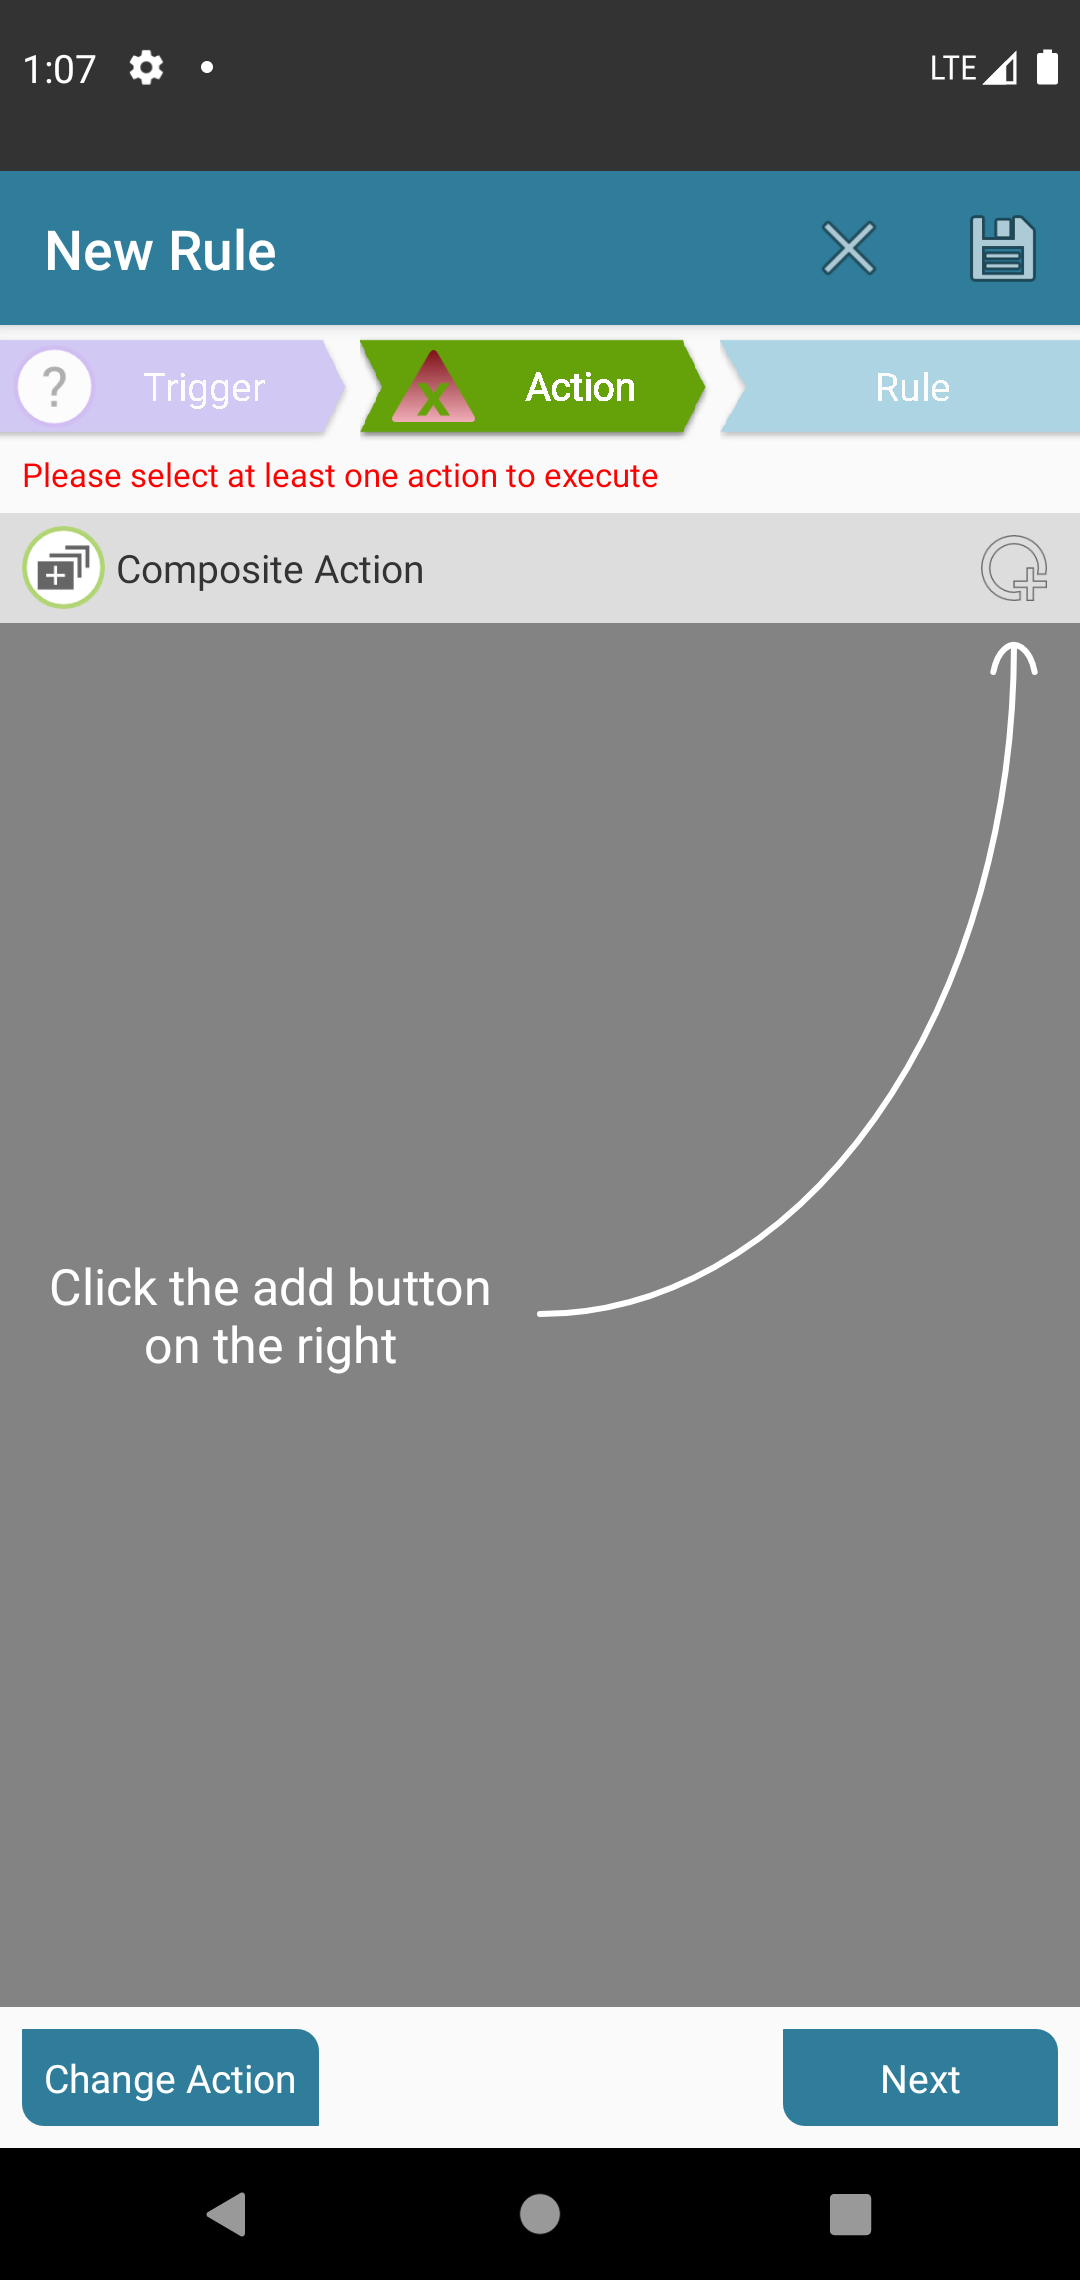
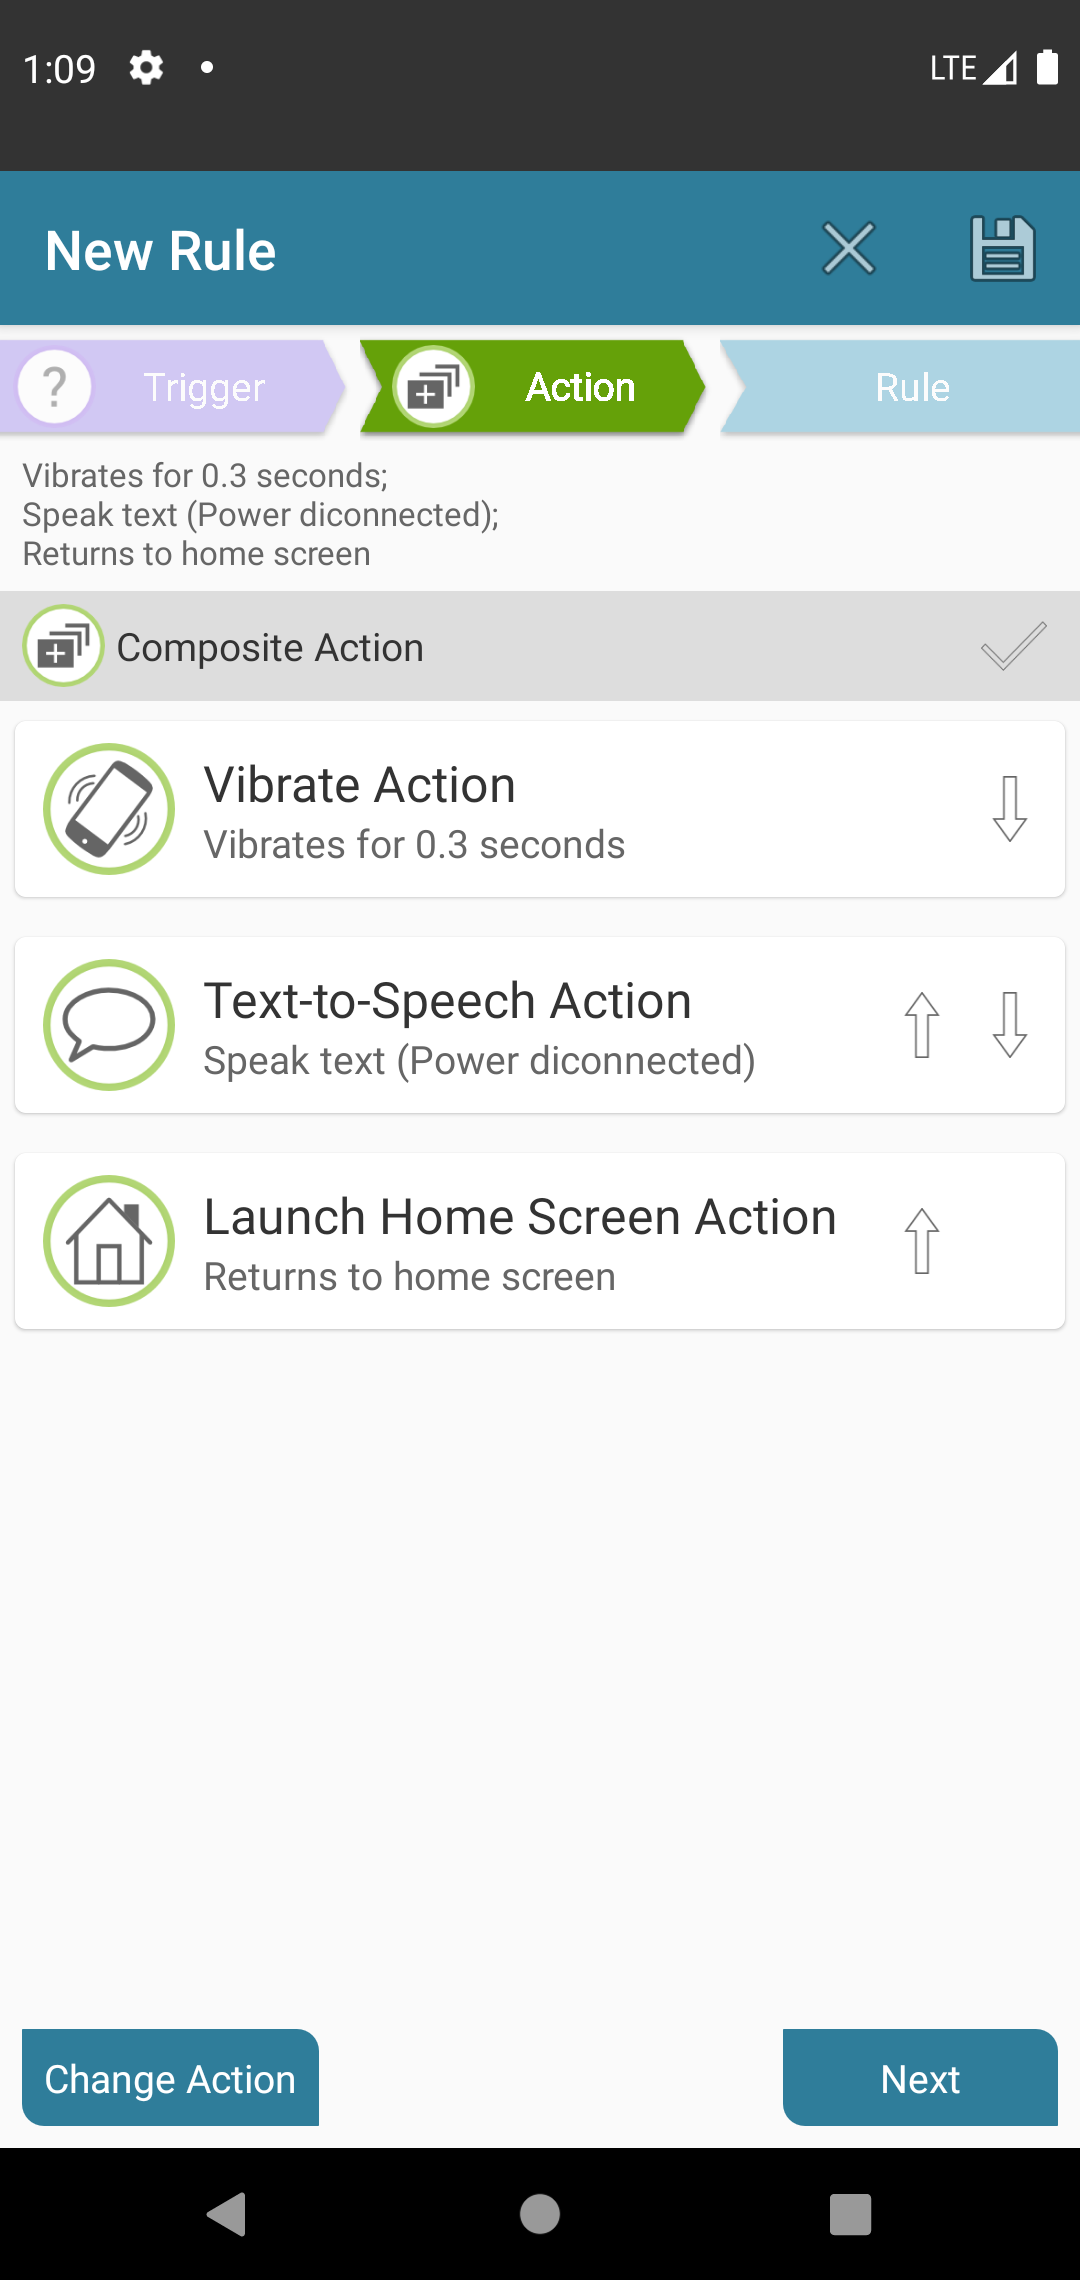
After selecting the composite action from the action list a special configuration screen will be open in the rule definition wizard, allowing you to configure the set of actions. Actions will be executed one by one according to the order they were selected.
Add action button
this button located on the right of the bar. By clicking the add button you will be able to choose action from the regular action list.
Note: There is no limit on the number of actions that can be contained in a single composite action.
Actions order
You can organize the order of executed actions by pressing the "Organize" button on the Composite Action toolbar. This will allow you to move each action up or down as desired.
Composite Trigger
Composite trigger allows you to define a set of triggers that when ALL or ANY of them is set, will trigger the rule. After selecting the composite AND trigger or the composite OR trigger, a special configuration screen (similar to the one of composite action described above) will be shown in the rule definition wizard, allowing you to configure the set of triggers and their parameters.
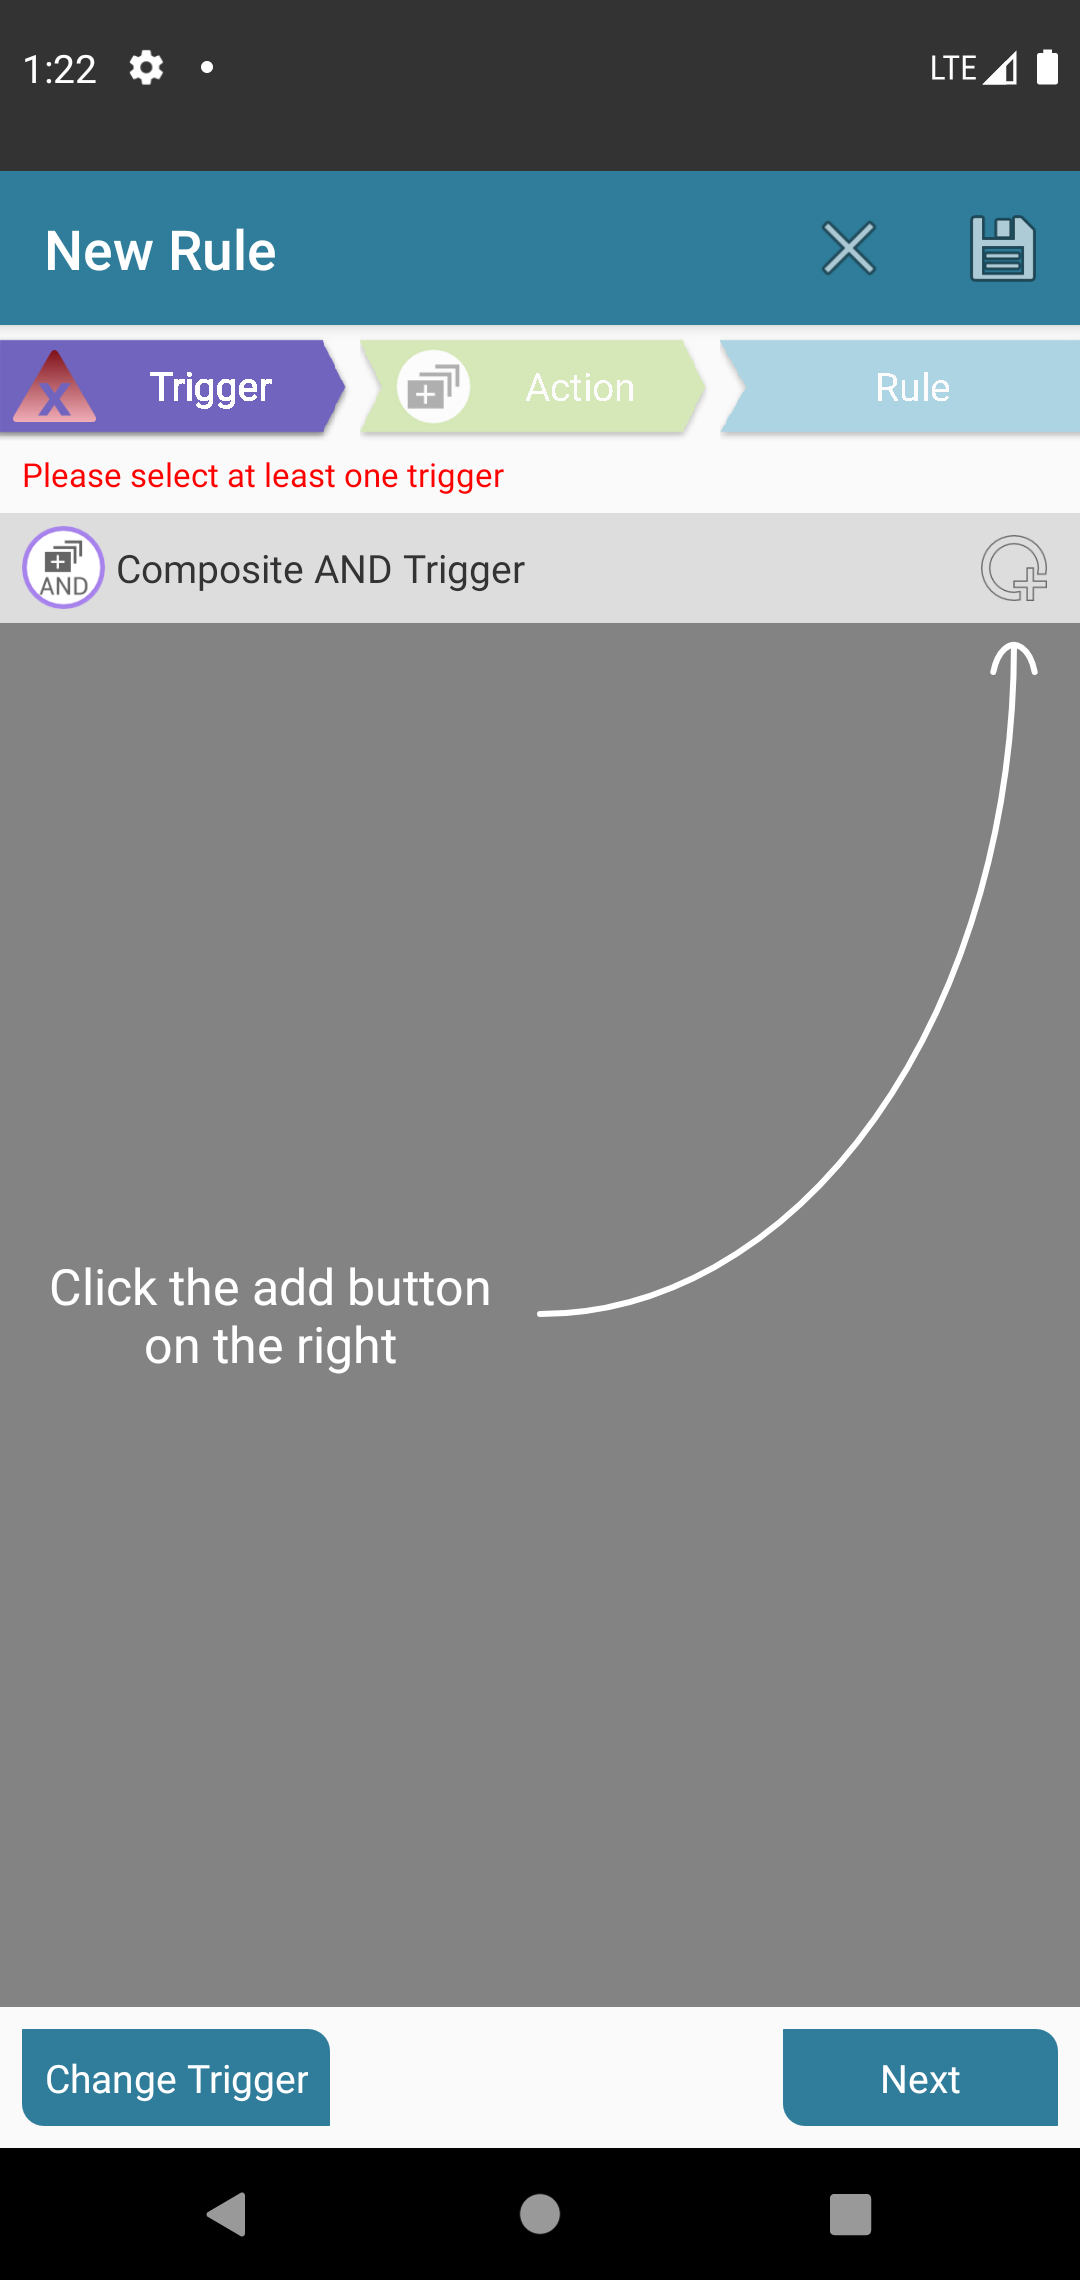
Add Trigger Button
This button located on the right of the bar. By clicking the add button you will be able to choose trigger from the regular trigger list.
Note: There is no limit on the number of triggers that can be contained in a single composite trigger.
Composite AND trigger
The AND trigger will launch the rule only when ALL defined sub-triggers occur.Composite OR Trigger
The OR trigger will launch the rule when ANY of its defined sub-triggers occur. That’s means if the first trigger occur the action will be executed and the following triggers will not be checked.Hierarchical Composite Triggers
Composite triggers can be used as any other trigger and be contained in another composite trigger. It might complicate things a bit but gives you a lot of flexibility when defining rules. This can be useful if you wish to combine composite AND trigger with a composite OR trigger, in the formation of (A AND (B OR C)) as an example.This feature is available on AutomateIt Pro or by unlocking it on AutomateIt Free
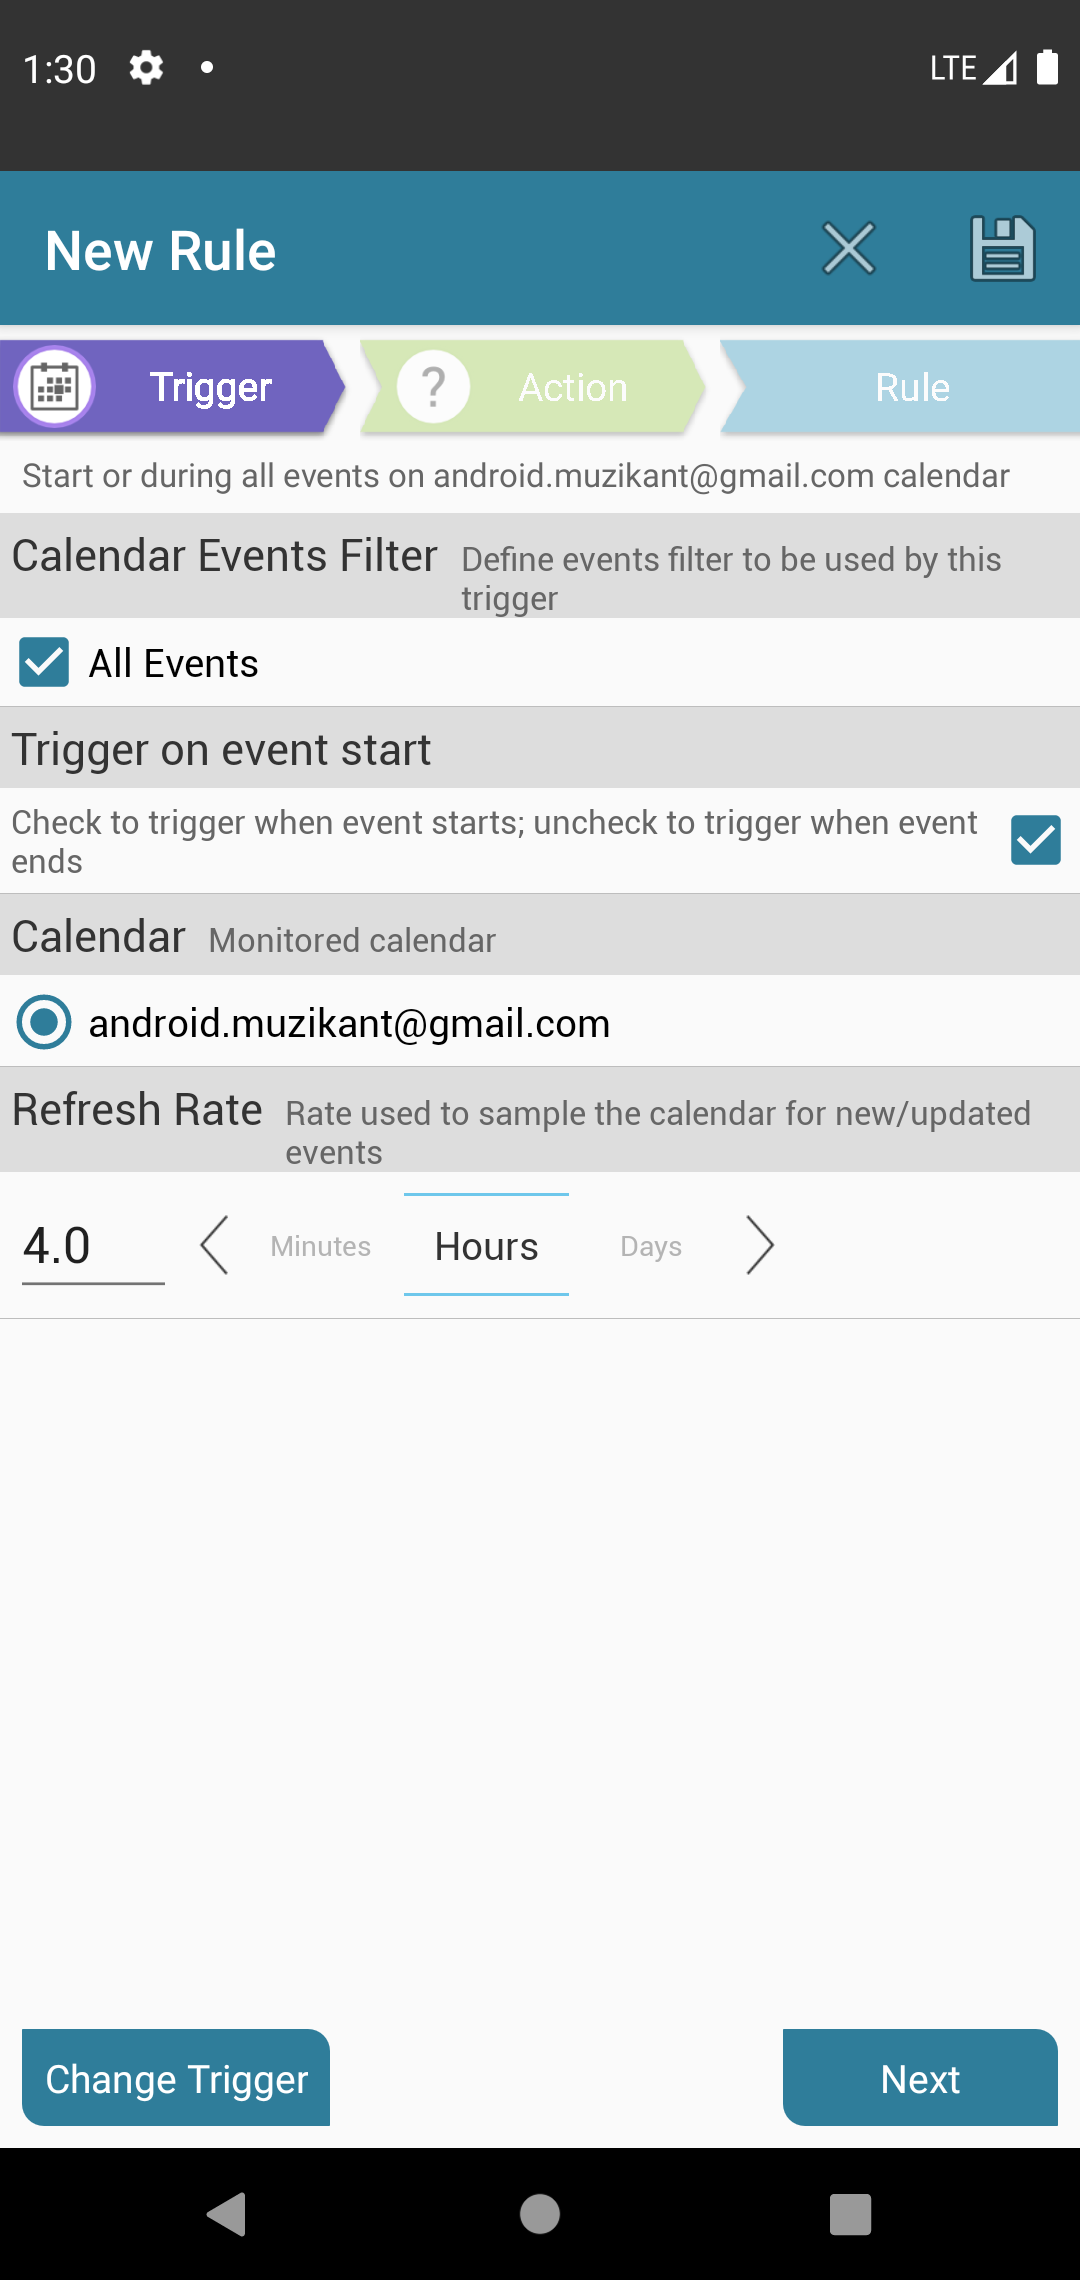
Calendar trigger allows your device to act once a calendar event starts or ends (Note: All day events are ignored).
The calendar trigger configuration has the following parameters:
Calendar
The calendar that will be monitored for events.
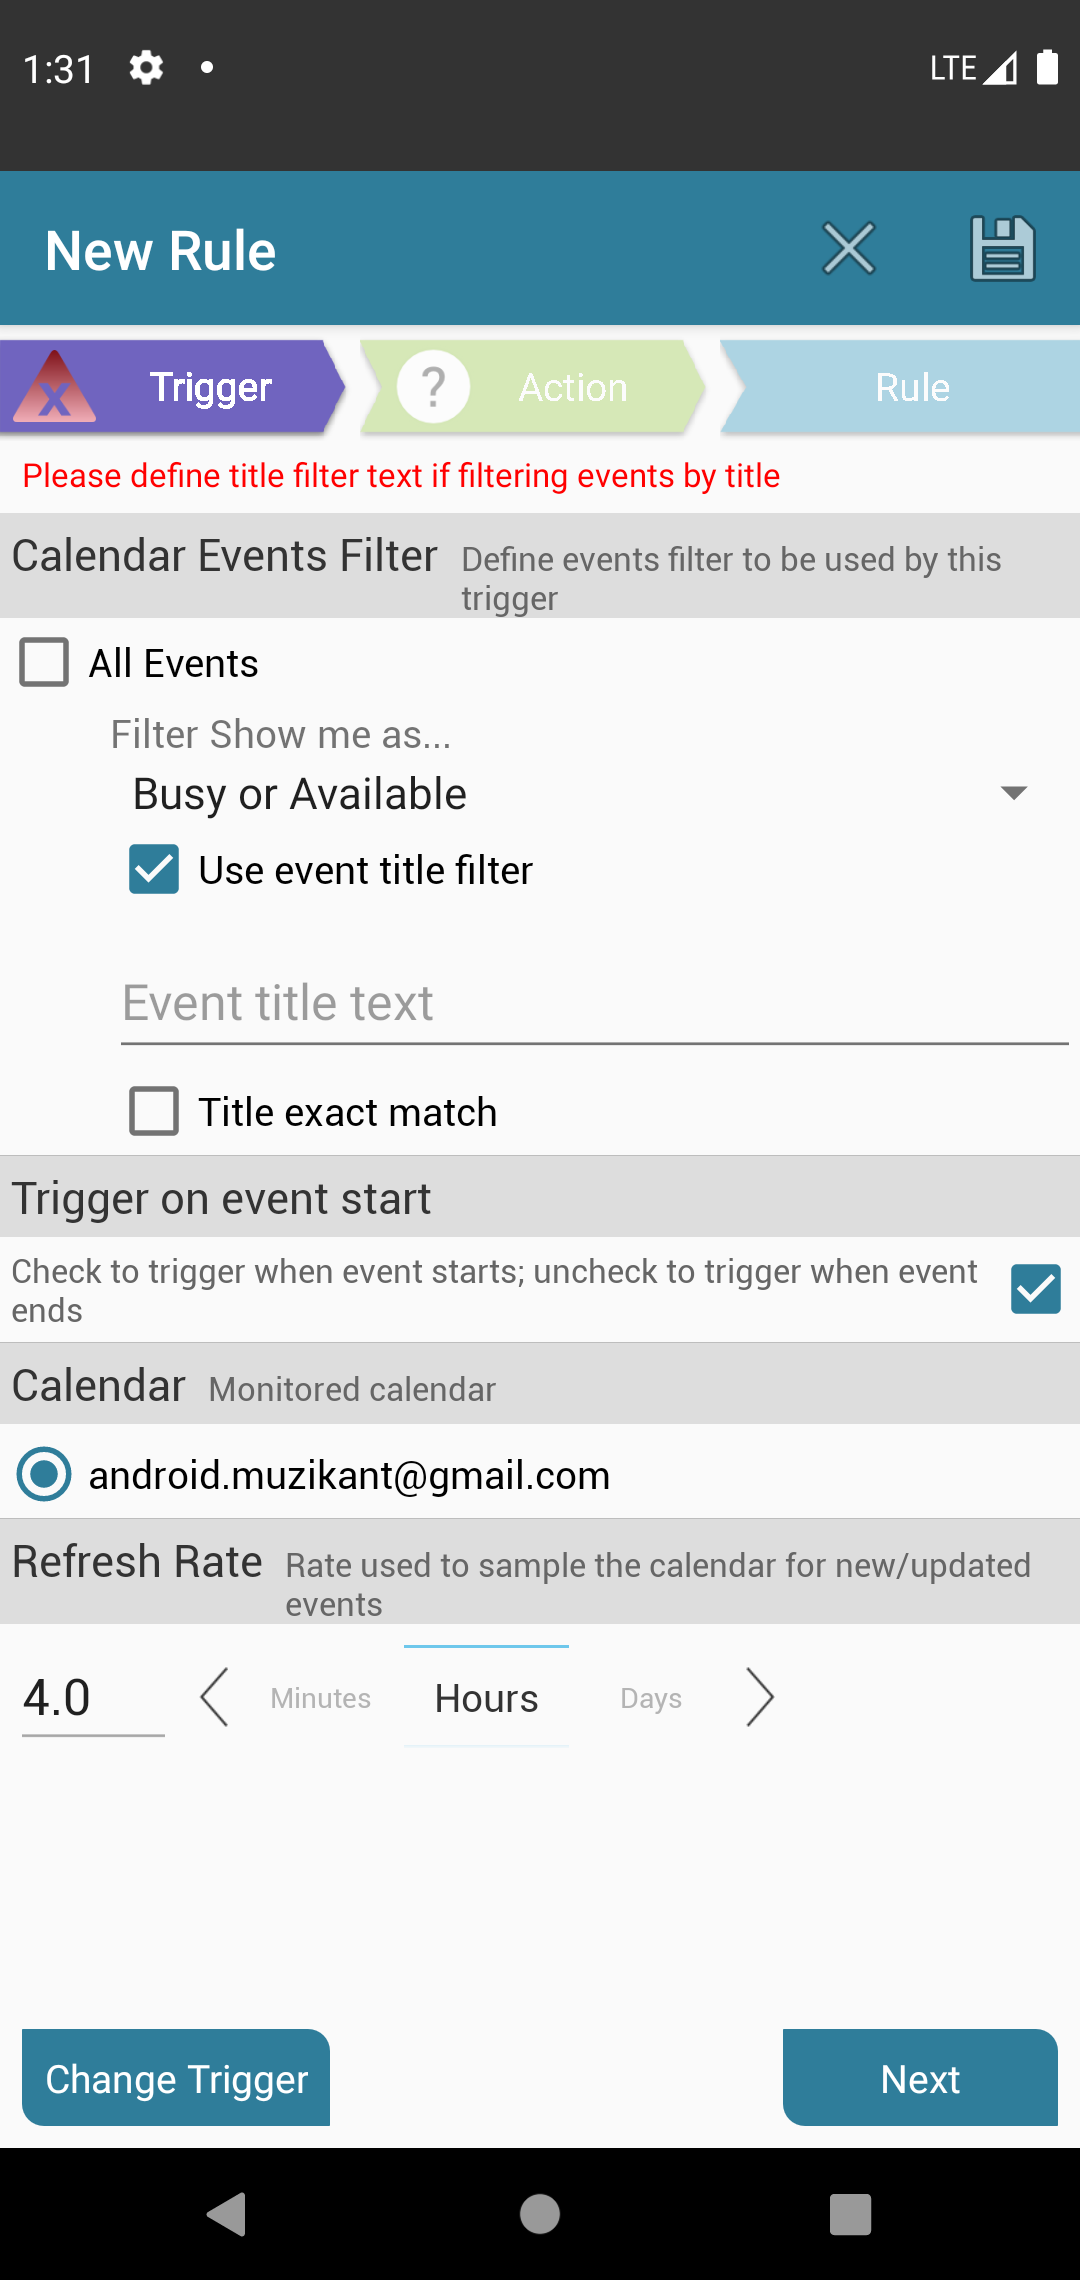
Calendar Events Filter
A filter that can be used to act on specific events. By default this setting is checked and that means no filter was set. When unchecking this setting to kinds of filters could be set:
- Filter show me as... - Triggers only on events with the selected "Show me as" status - can be Busy Only\Available Only\Busy or Available.
- Event title filter - Filter events by their title. Can be an exact match or partial match by checking/unchecking the "Title exact match" checkbox.
Trigger on event start
When this checkbox is checked, the trigger will launch on the beginning of the events matching the defined filter on the selected calendar. When this checkbox is unchecked, the trigger will launch when the events ends.
Note: If this trigger is used as part of a Composite AND Trigger, this checkbox acts as a during/not during indication.
Refresh Rate
Since the calendar events might change, this trigger requires refreshing once in a while to keep track of the updated upcoming events. By default this is set to 4 hours. (Default value can be changed from the Settings screen).
So what is the Cell Id Trigger?
Without getting too technical, your device is using cell towers to connect to the cellular network, and as you move from one place to another, the device is connecting to different cells. This trigger monitors the cells your device is connected to, allowing you to define triggers for connecting or disconnecting from cells in desired areas.
Cell Id Trigger Configuration
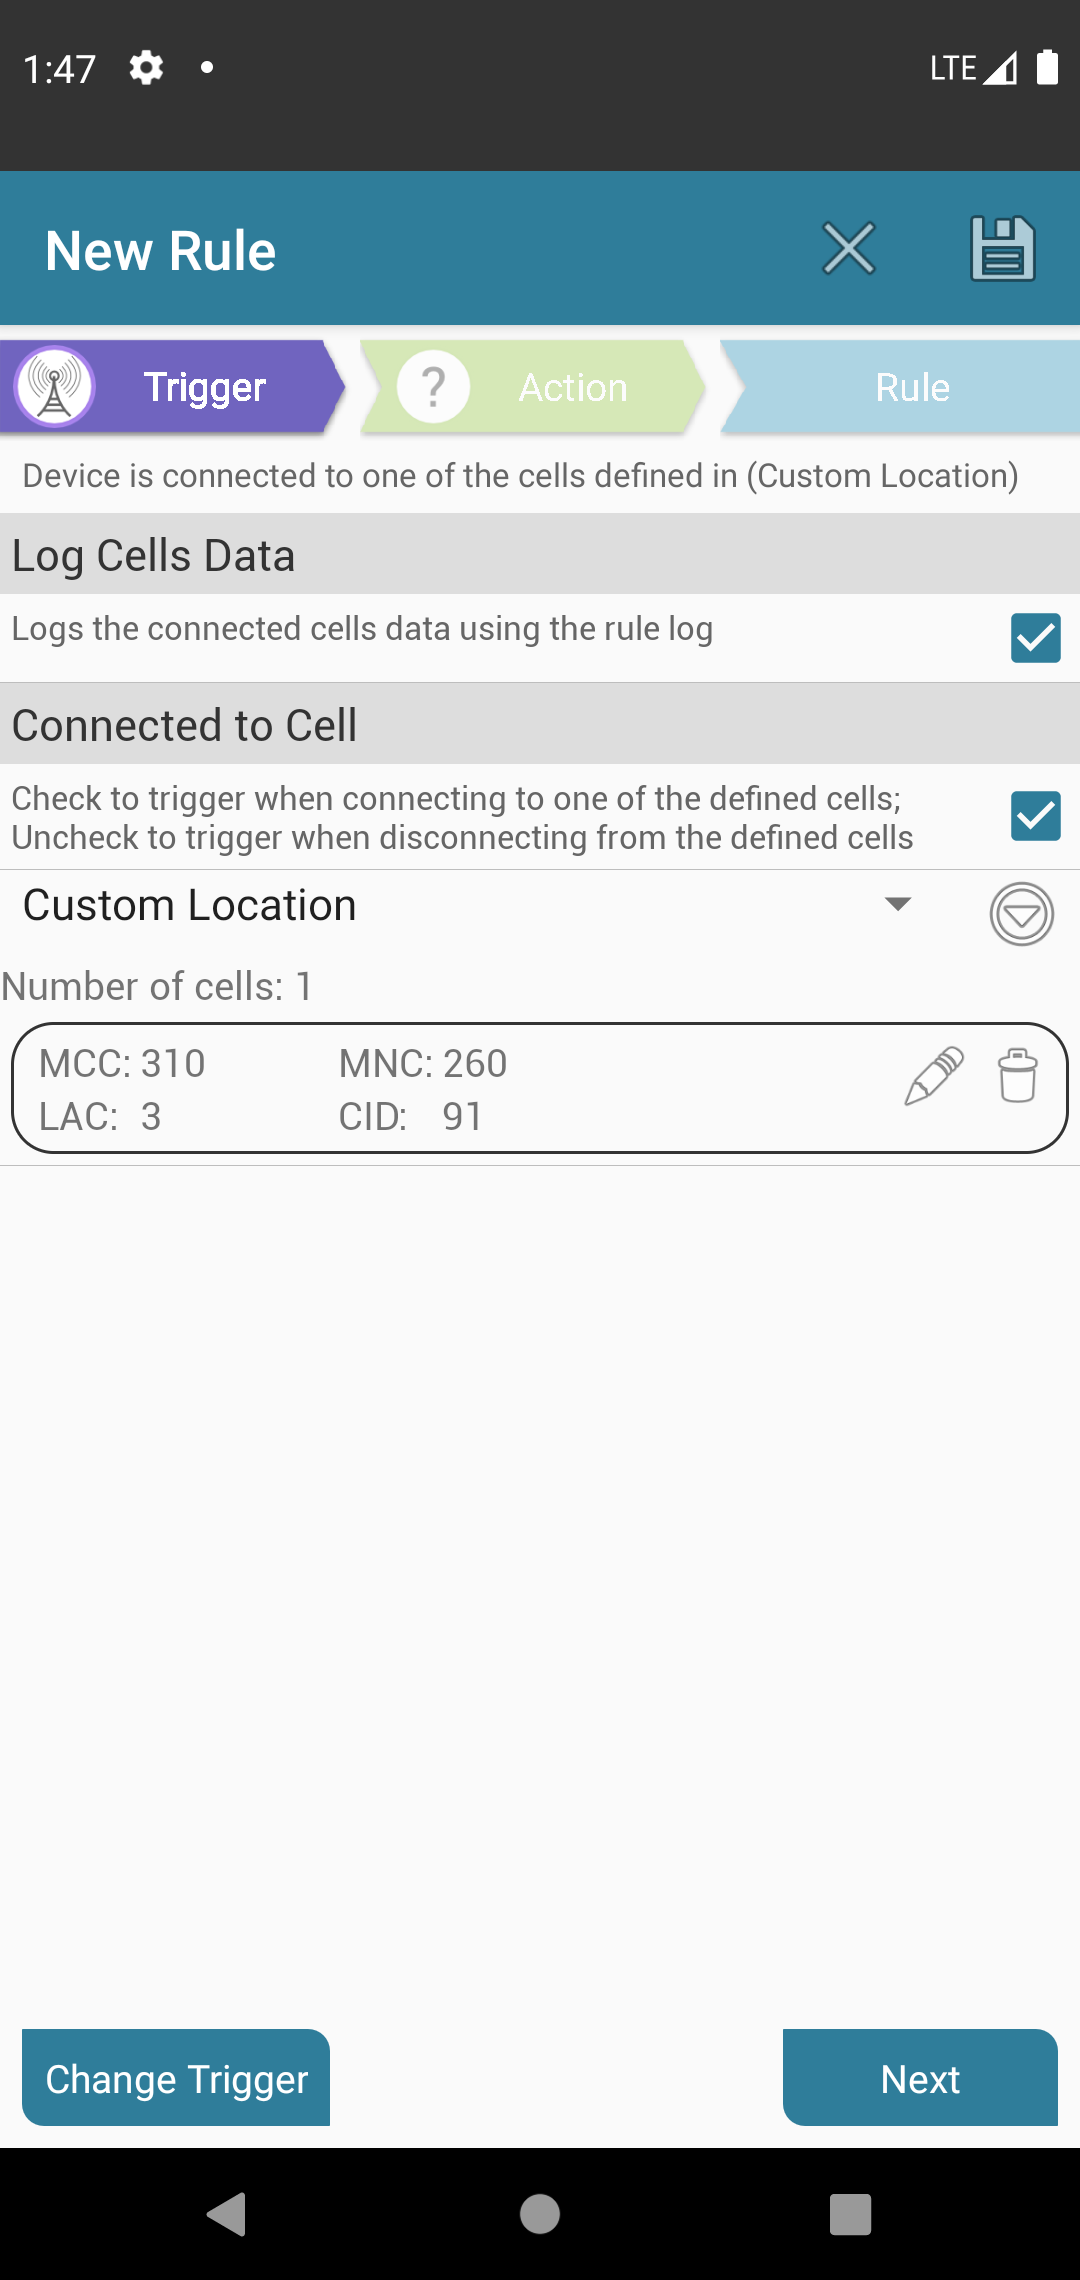
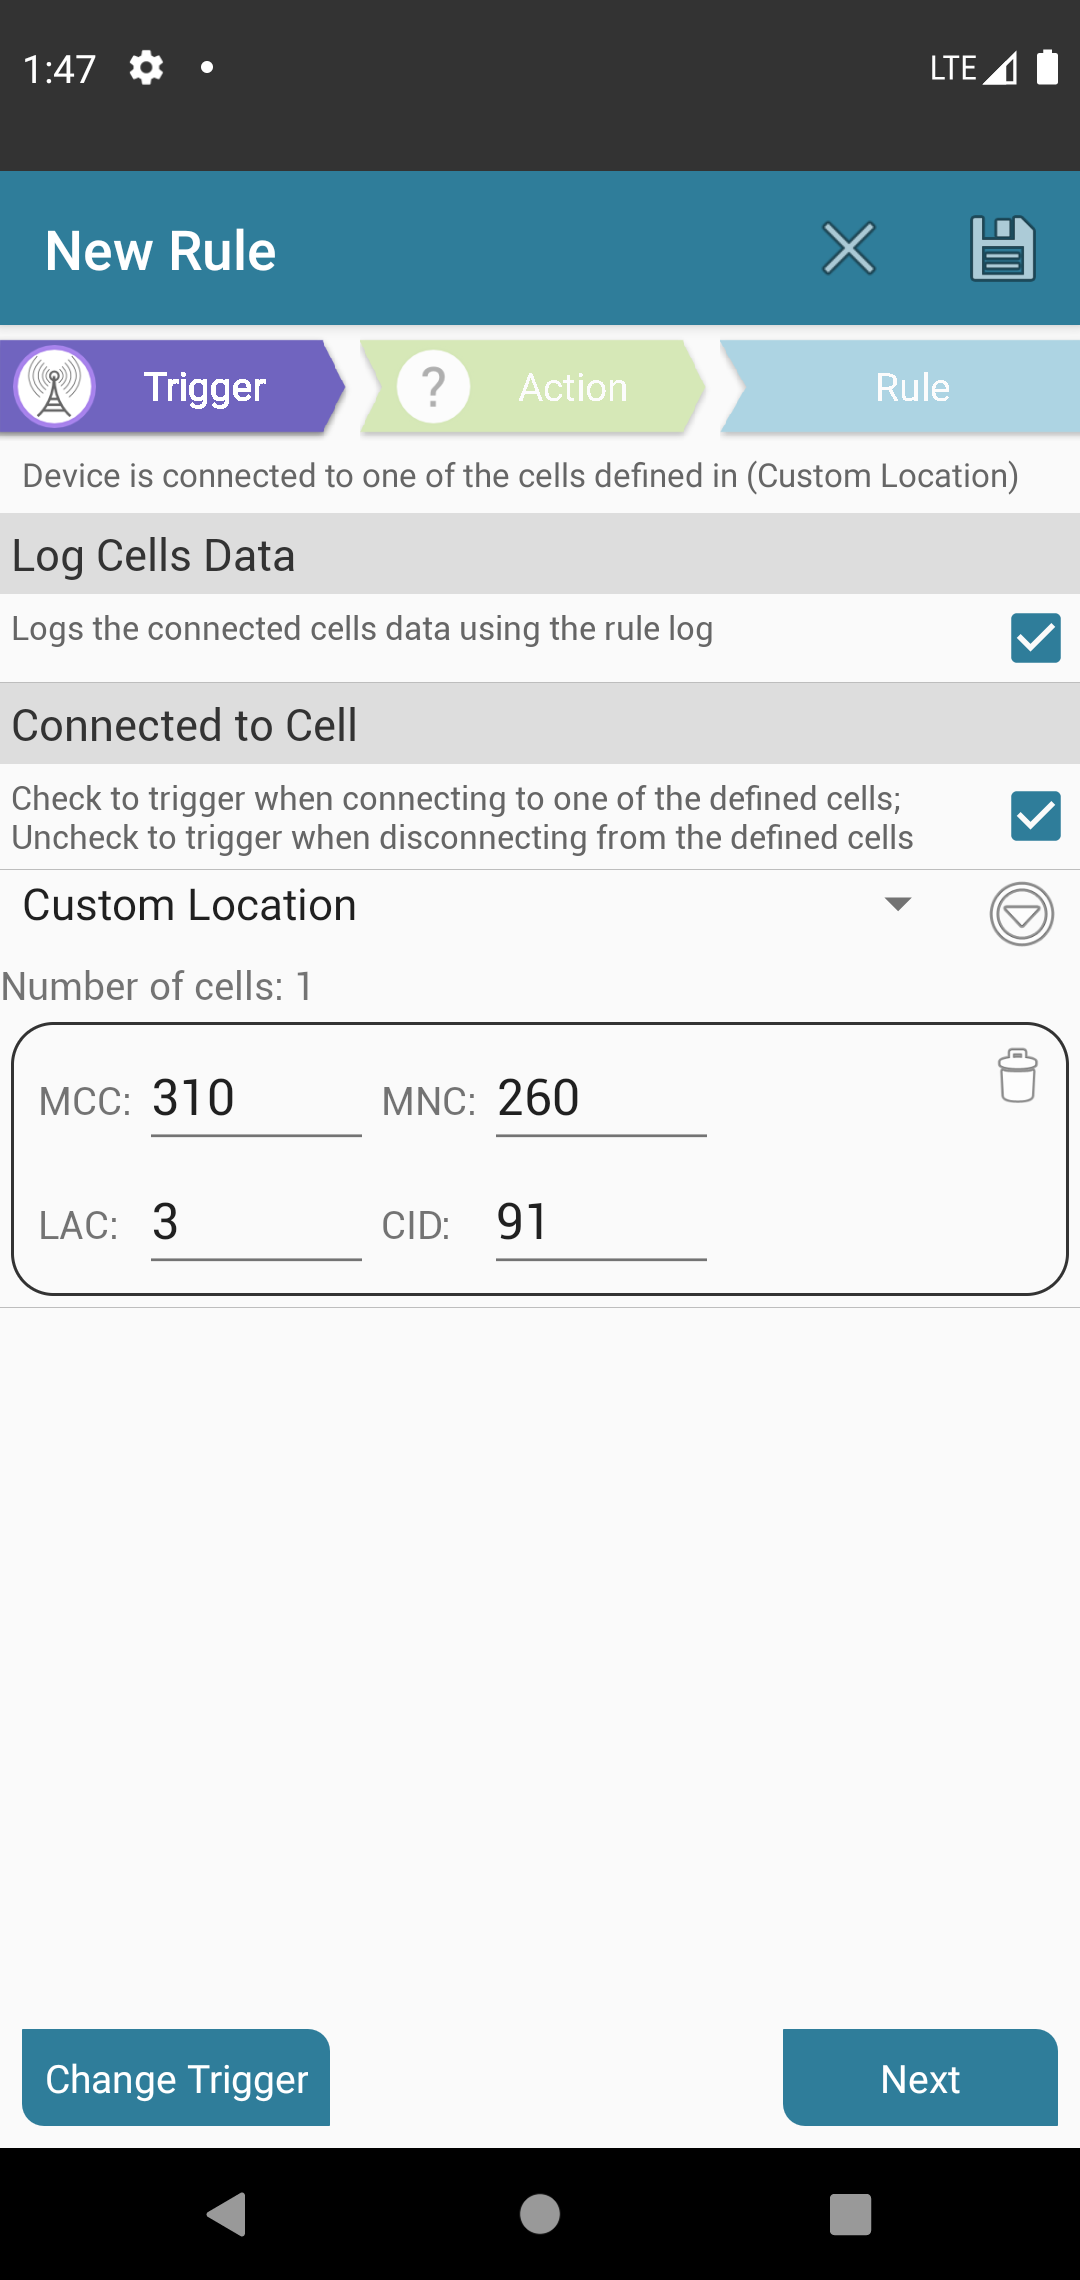
The trigger configuration screen has the following parameters:
Log cells data
When this setting is checked, whenever your device connects to a new cell, it will be logged to the rule log. The log will contain the cell details and an indication whether the rule is active or not.
Connected to cell
This setting lets you define whether the trigger will launch when you are connected to one of the defined cells or when you are not connected to any of the defined cells.
Cell list
Each cell displayed has two buttons on the right side allowing you to remove the cell from the trigger or edit its details.
Custom Location
The dropdown list lets you select a location. A location is a saved set of cells which you can define. When defining your first Cell Id trigger, you don't have any saved locations so you will only be able to select "Custom Location". When you select a location it shows the list of cells which comprise the selected location.
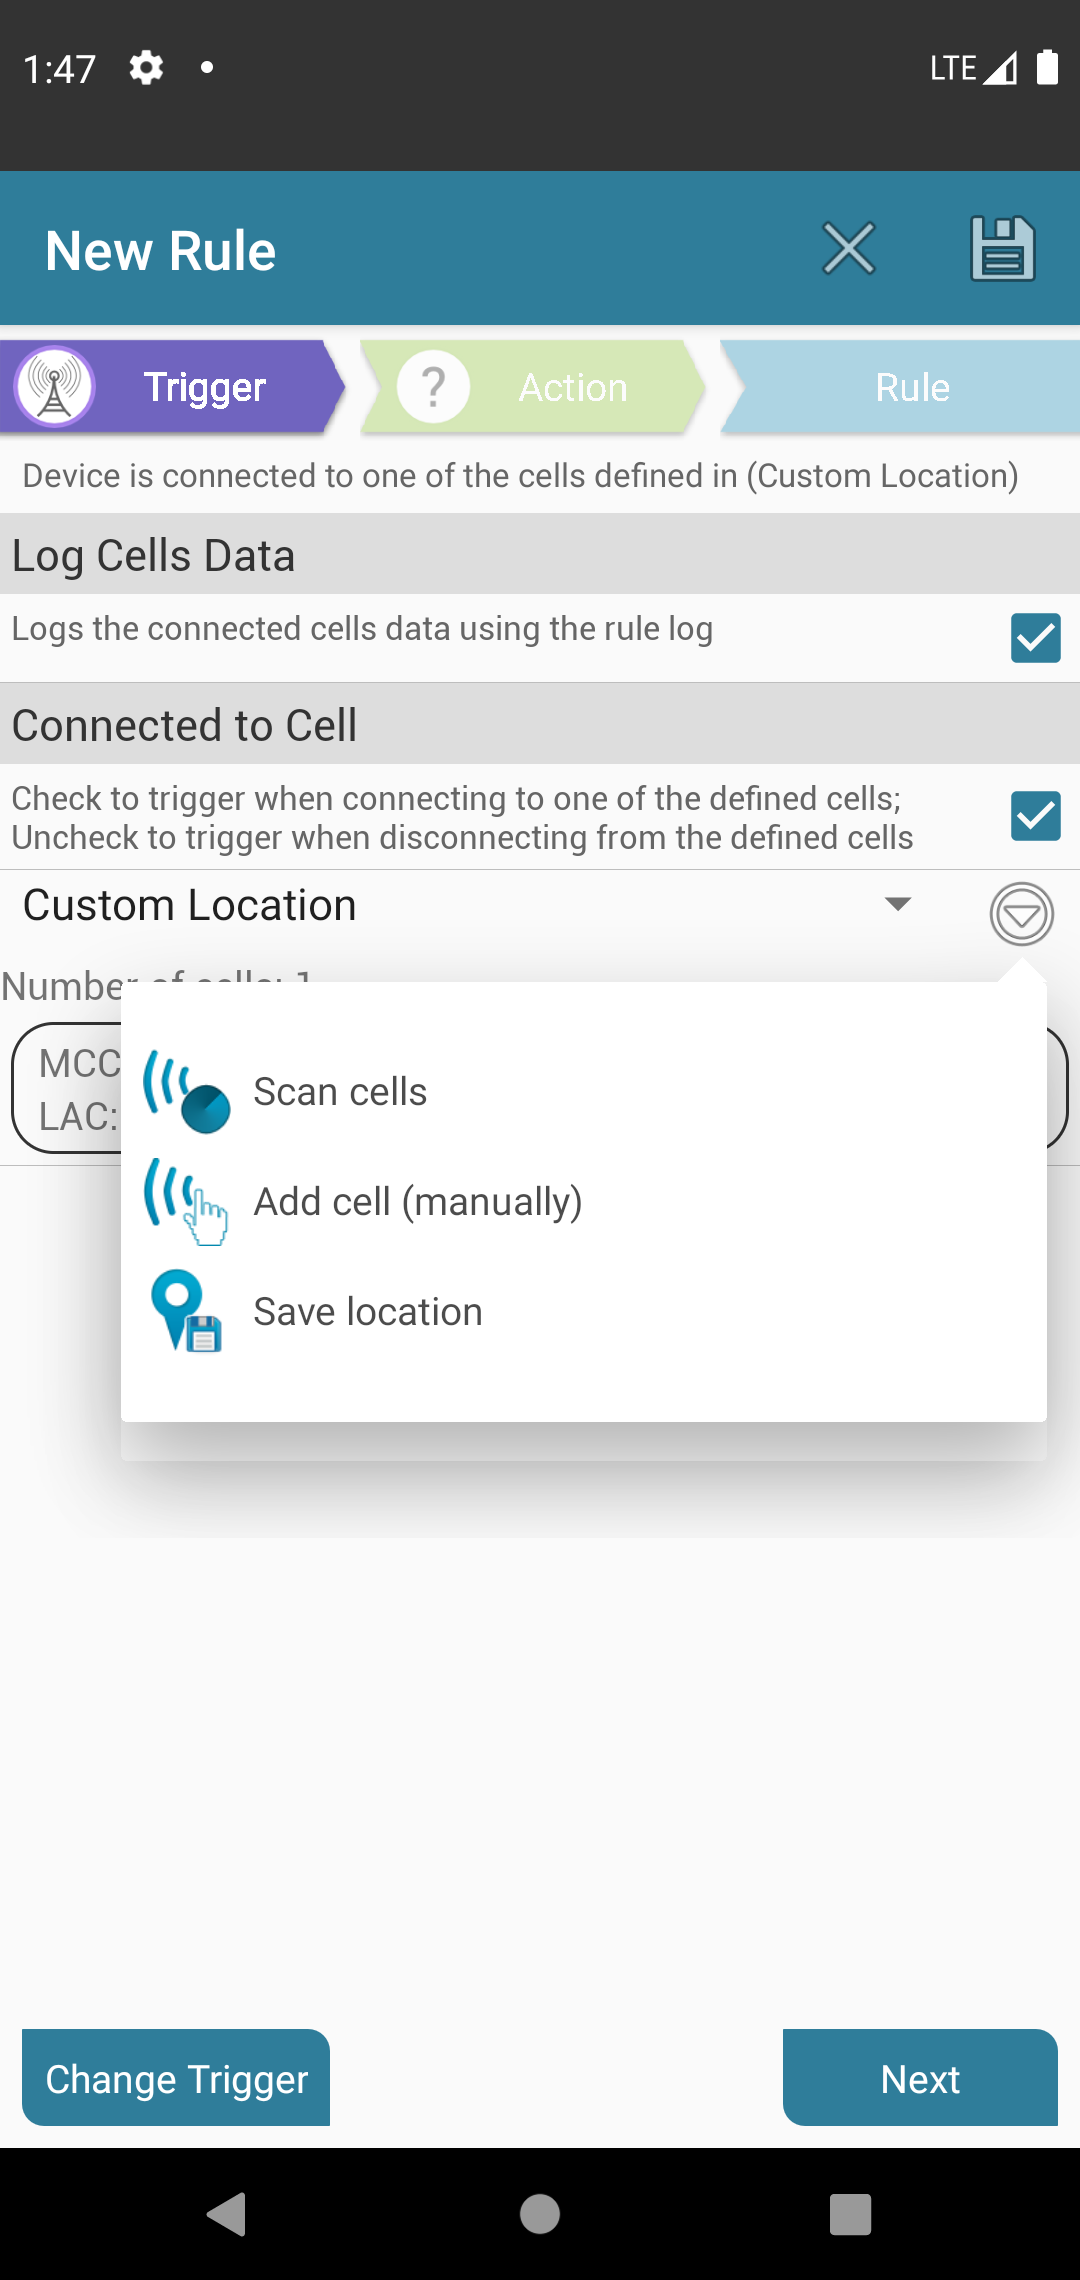
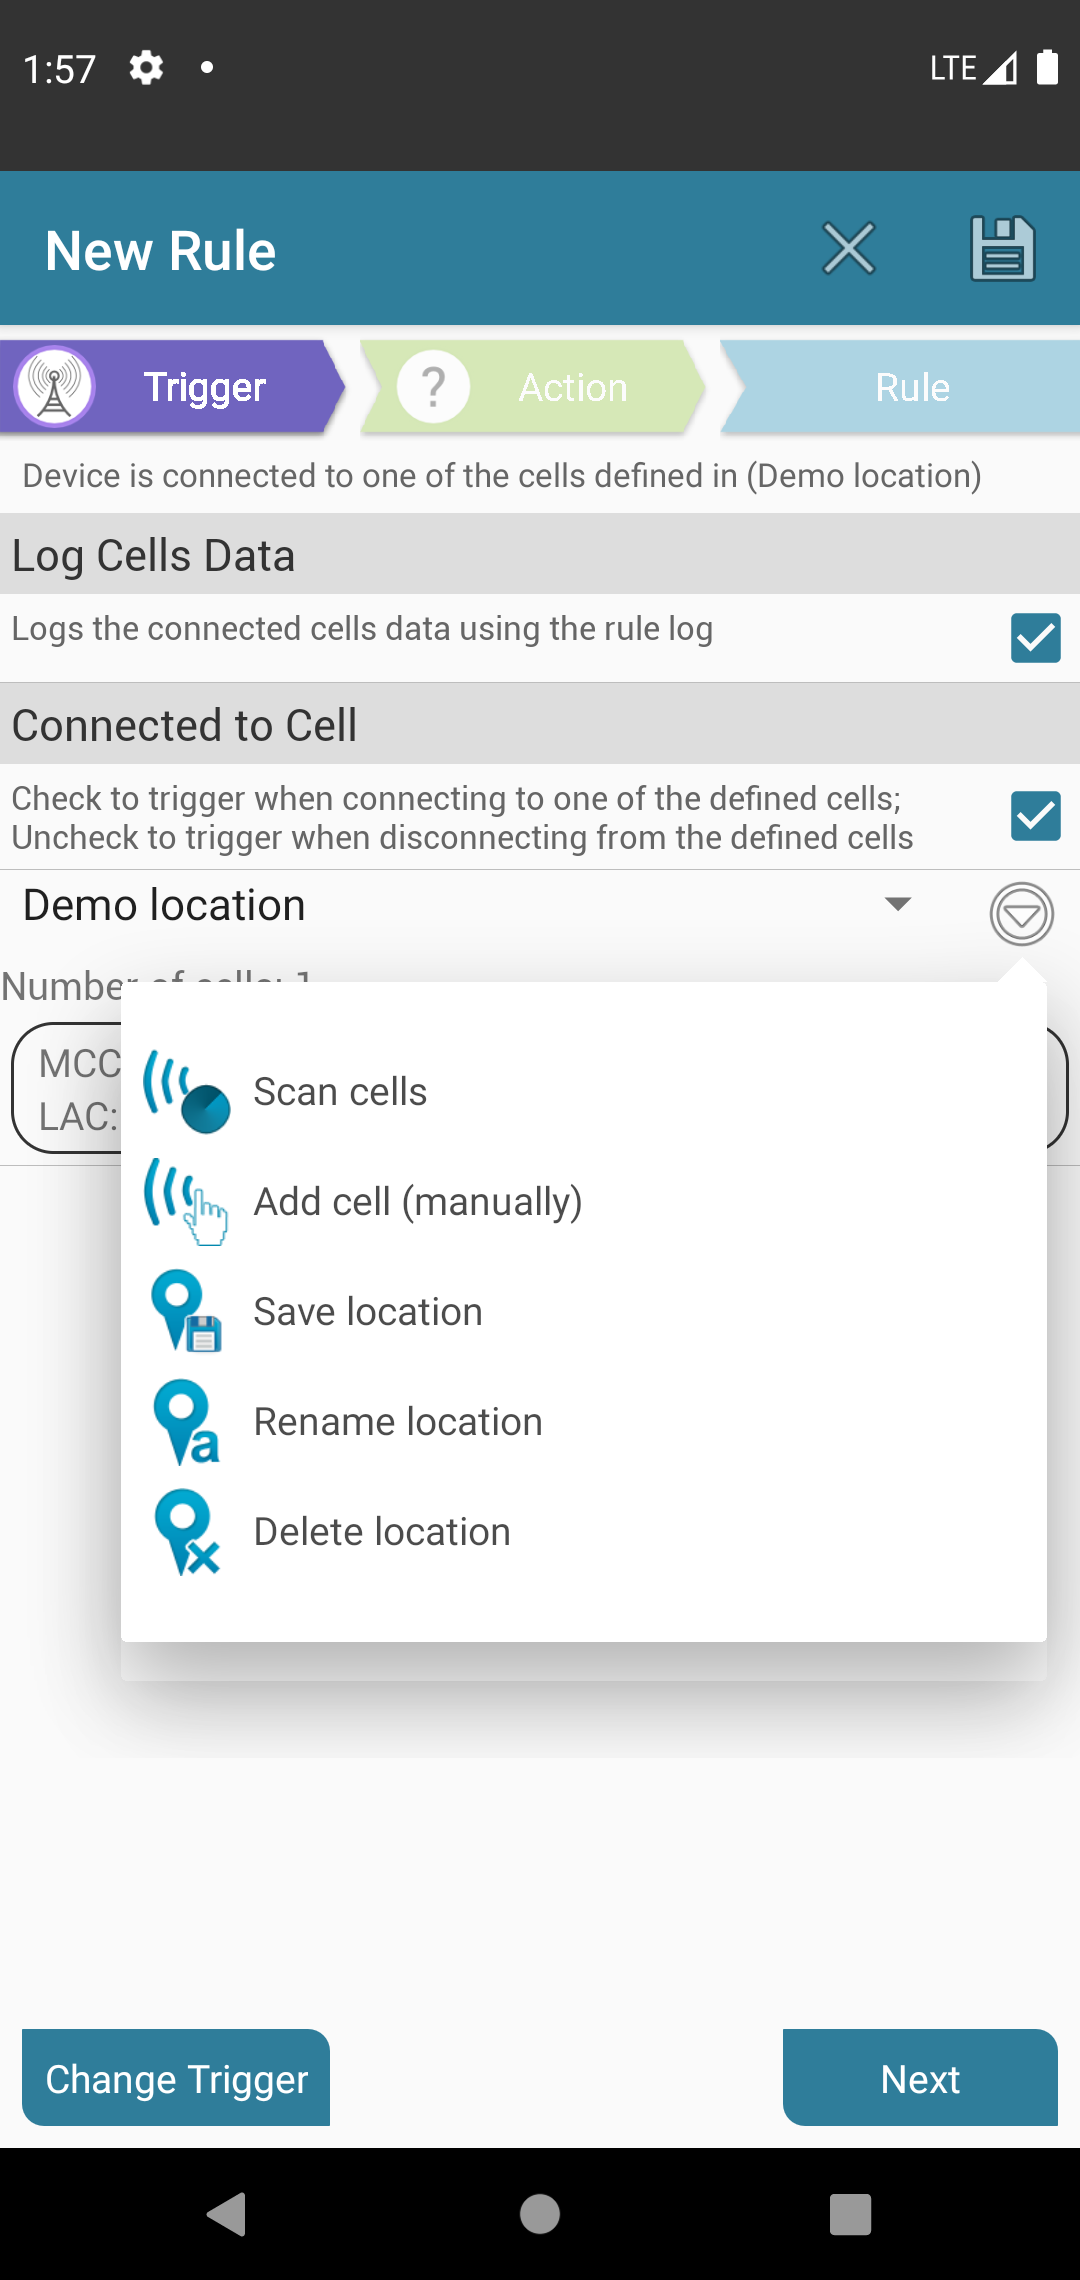
To configure the list of cells, you should click the menu icon to the right of the location selection box, which will show the following menu:
The menu has the following options:
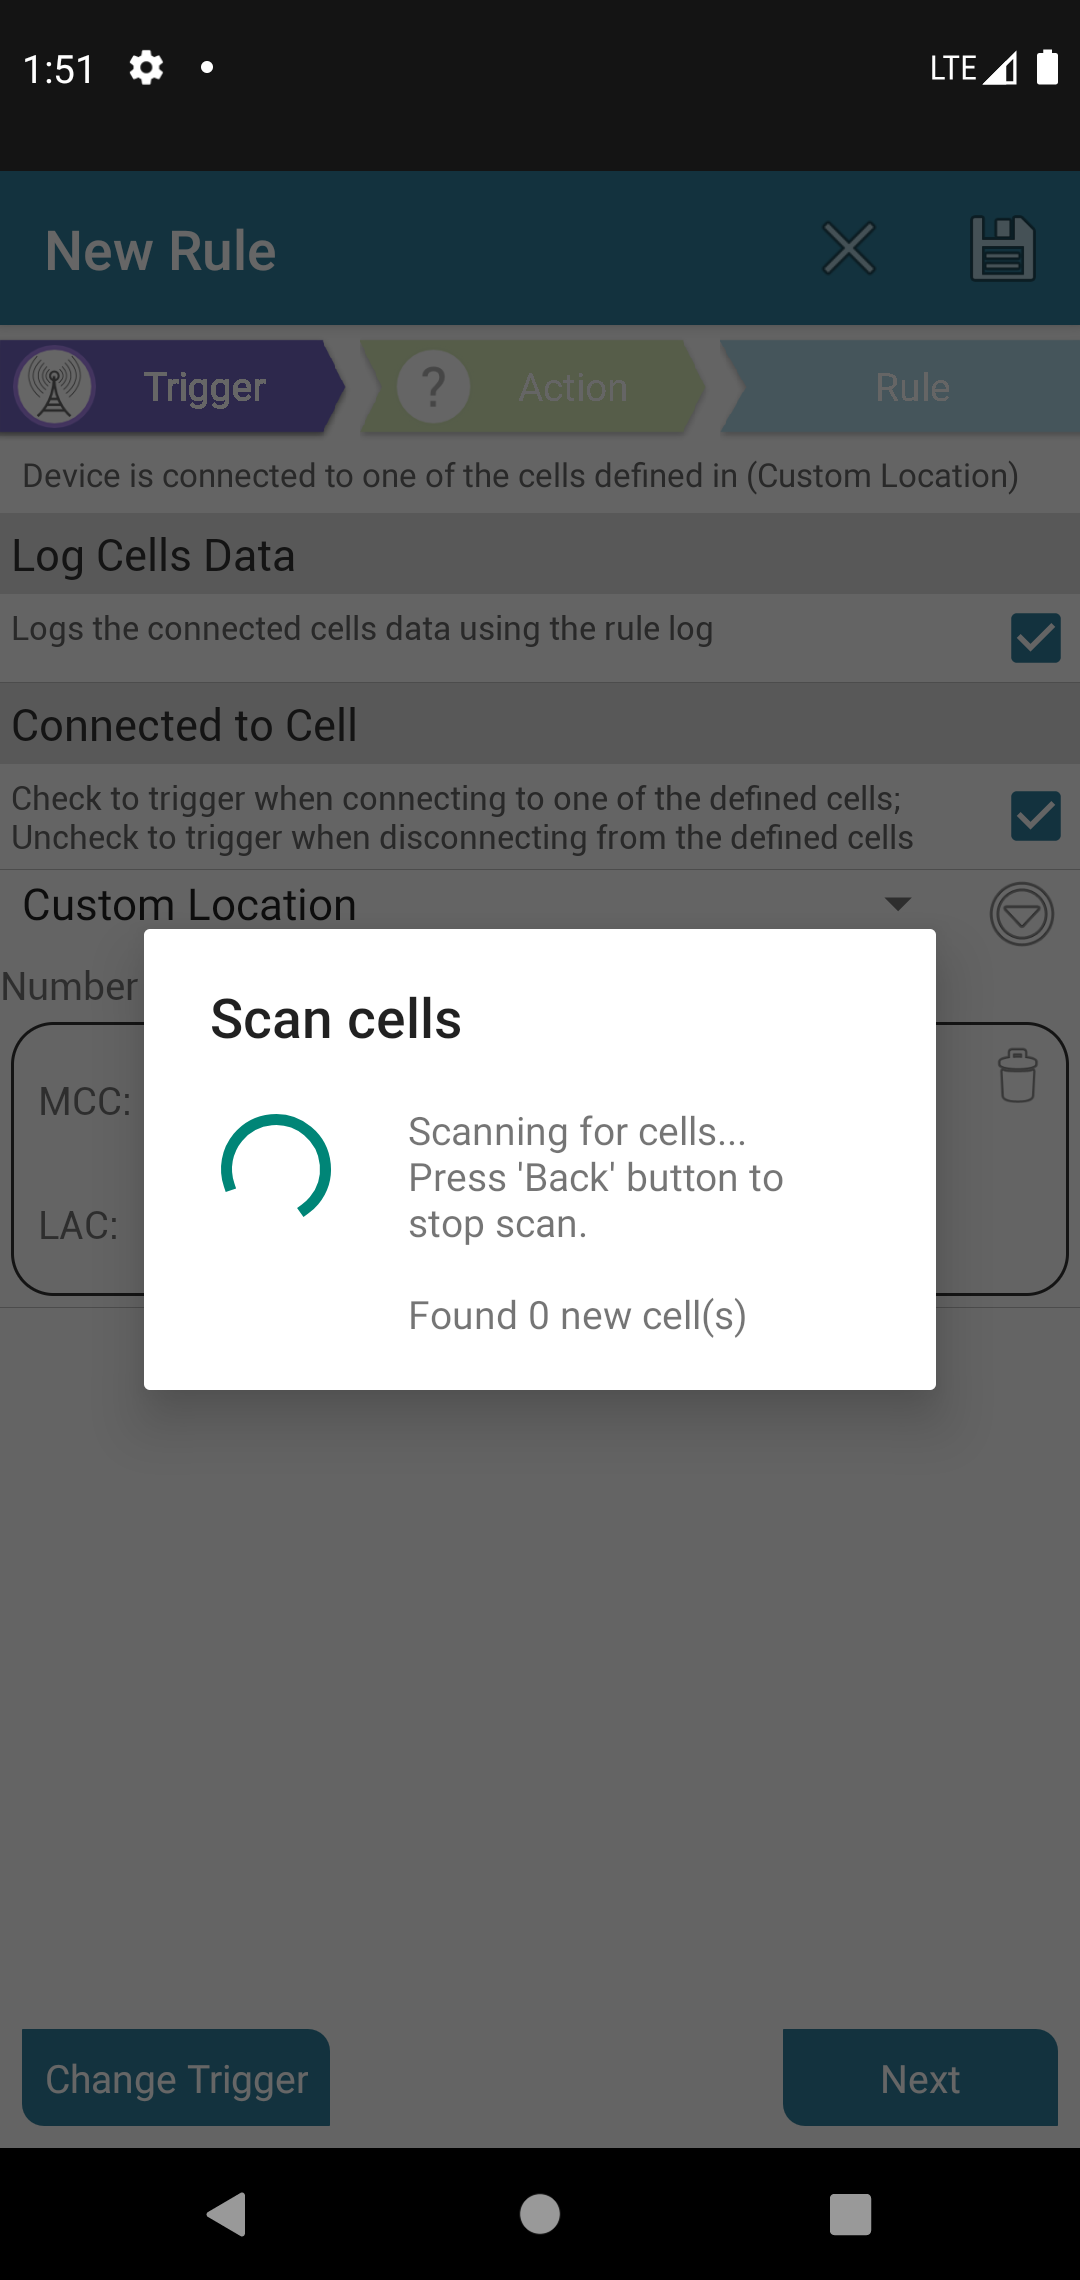
Scan cells
The application will start monitoring connected cells, adding all found cells to the list of cells. The scan will continue until you press the "Back" button. Notice that in some areas it could be that there is a large number of cells to scan so it is recommended to try and scan for cells several times during the day until all cells in the area are acquired.
Add cell (from recent)
Once you start using the Cell Id Trigger, AutomateIt keeps a log of the recent cells your device was connected to so in case your trigger does not recognize a cell which you want to include in one of your triggers, you can use this option to add the cell from the list of recent cells. When clicking this option, a list of cells is displayed allowing you to select one or more cells that will be added to your trigger. Each cell shows the time your device was connected to the cell and some information of the connected cell.
Add cell (manually)
In addition to the "Scan cells" and "Add cell (from recent)", you can manually add cells. When selecting this option from the menu, you will be required to enter the cell details as follows:
Save location
In order for you to be able to define several triggers which relate to the same location (for instance, Arrived home and Left home) you can save the set of cells as a location which will be available for selection using the selection box on the trigger configuration screen (AutomateIt free version only allows saving a single location while the Pro version has no limitation on the number of saved locations). The main advantage of saving locations is if you have more than a single trigger using the same location, updating it through one trigger will affect all triggers using the same location. When a saved location is selected the menu will have two more options:
Rename location
That's pretty much self-explanatory...
Delete location
This option deletes the saved location but does not remove the cells from trigger.
Note - GSM vs. CDMA
Currently AutomateIt was only tested for GSM support and has CDMA support as an experimental feature. If you have a CDMA-based device and use this trigger please keep in mind that this was not fully tested and report any errors using the "Help" button on the About screen of the application.
Cell Id Settings
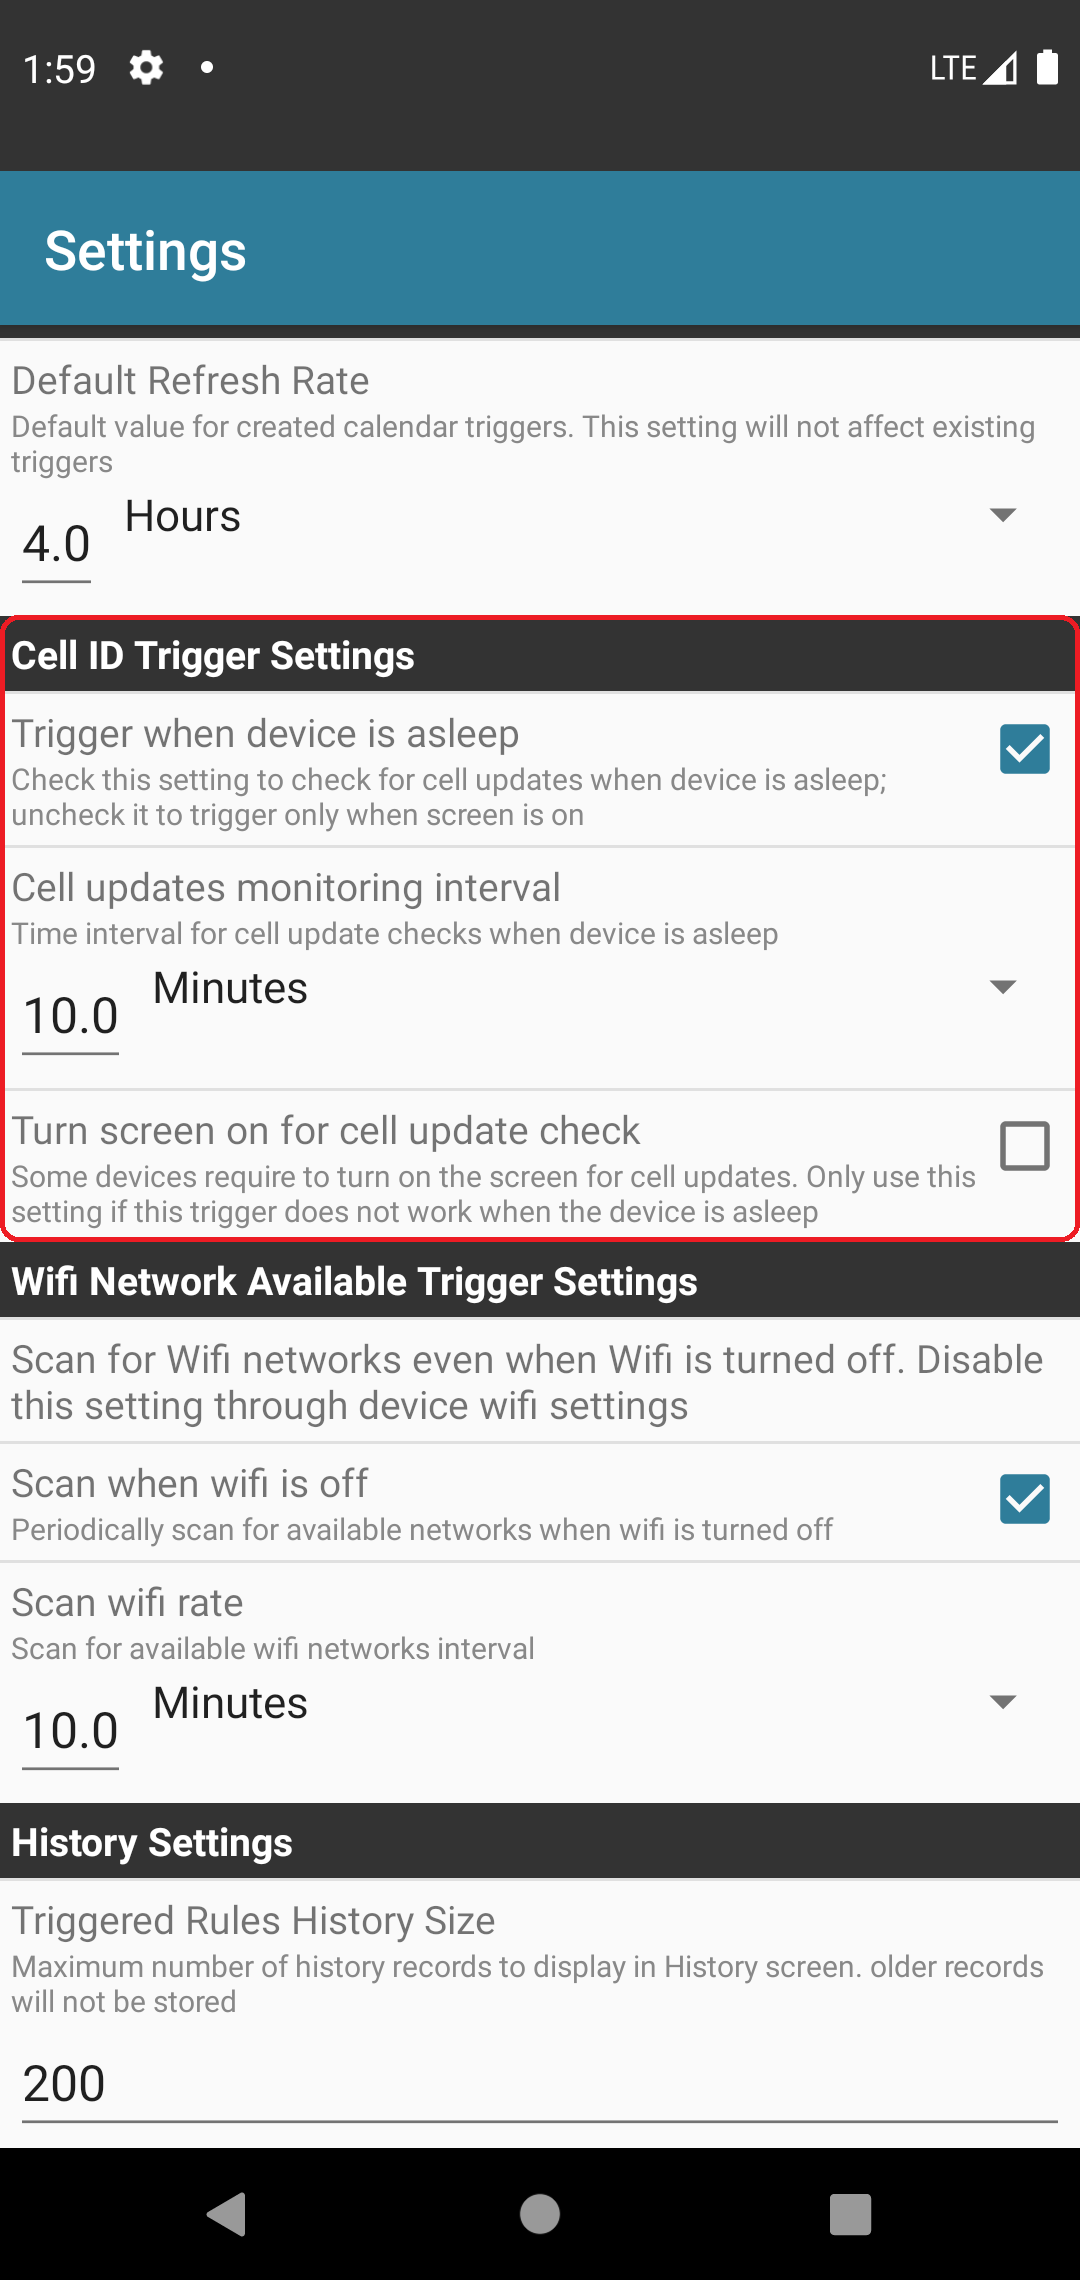
The Cell Id Trigger has some general settings that can be changed using the application settings screen:
Trigger when device is asleep
Using this setting you can choose to monitor connected cells even when the device is asleep, otherwise, it will only monitor connected cells when the device screen is on. By default, this setting is set so it will monitor cells even when the device is asleep. Please notice that un-checking this setting will not necessarily prevent your device from checking for cell updates, but it will not enforce it to check for updates every defined interval. In case some other application wakes the device it could be that the trigger will still launch. If you wish to prevent the trigger from executing when device is asleep, it's recommended using the Composite AND Trigger available on the Pro version and combine it with a "Screen On Trigger".
Cell updates monitoring interval
When the previous setting is set, AutomateIt will check for connected cell on specific time intervals as defined by this setting.
Turn screen on for cell update check
This setting determines if when checking for cell updates the device screen will be turned on. For most devices this is not required and by default this will be set to false. If despite the fact you set the "Trigger when device is asleep" setting, the trigger does not launch when the device is asleep, try using this setting.
Screen on duration (ms)
When using the "Turn screen on for cell update check" setting, this setting is used to define the screen on duration. By default this is set to 500 milliseconds.
This feature is available on AutomateIt Pro or by unlocking it on AutomateIt Free
Sensor trigger allows you to use the built-in sensors that your device has and define rules based on specific sensor states.This trigger can be used with its basic presets or can be tweaked by using more advanced customization.
Basic customization
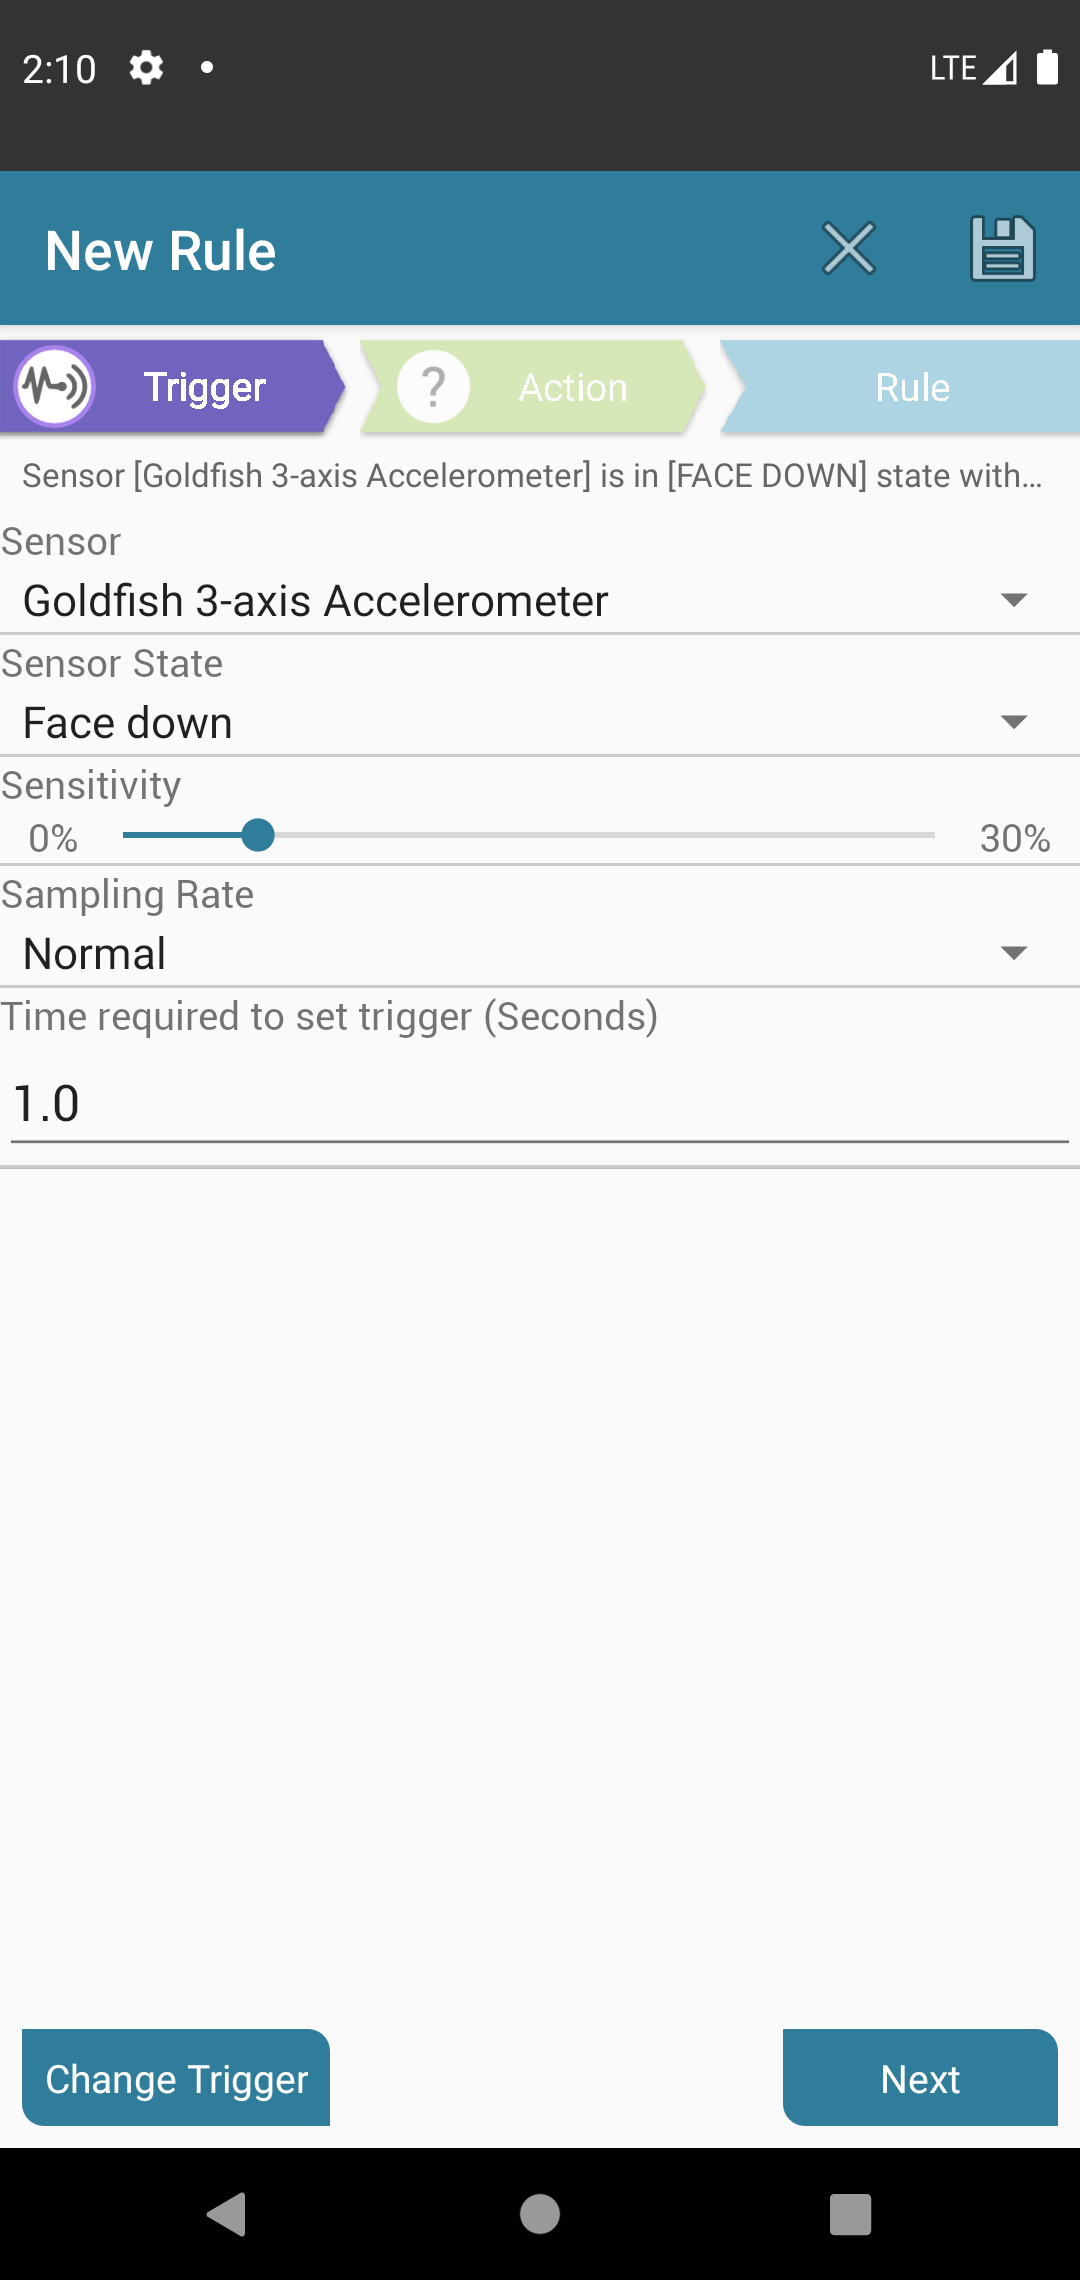
After selecting the "Sensor Trigger" it can be customized using the following screen:
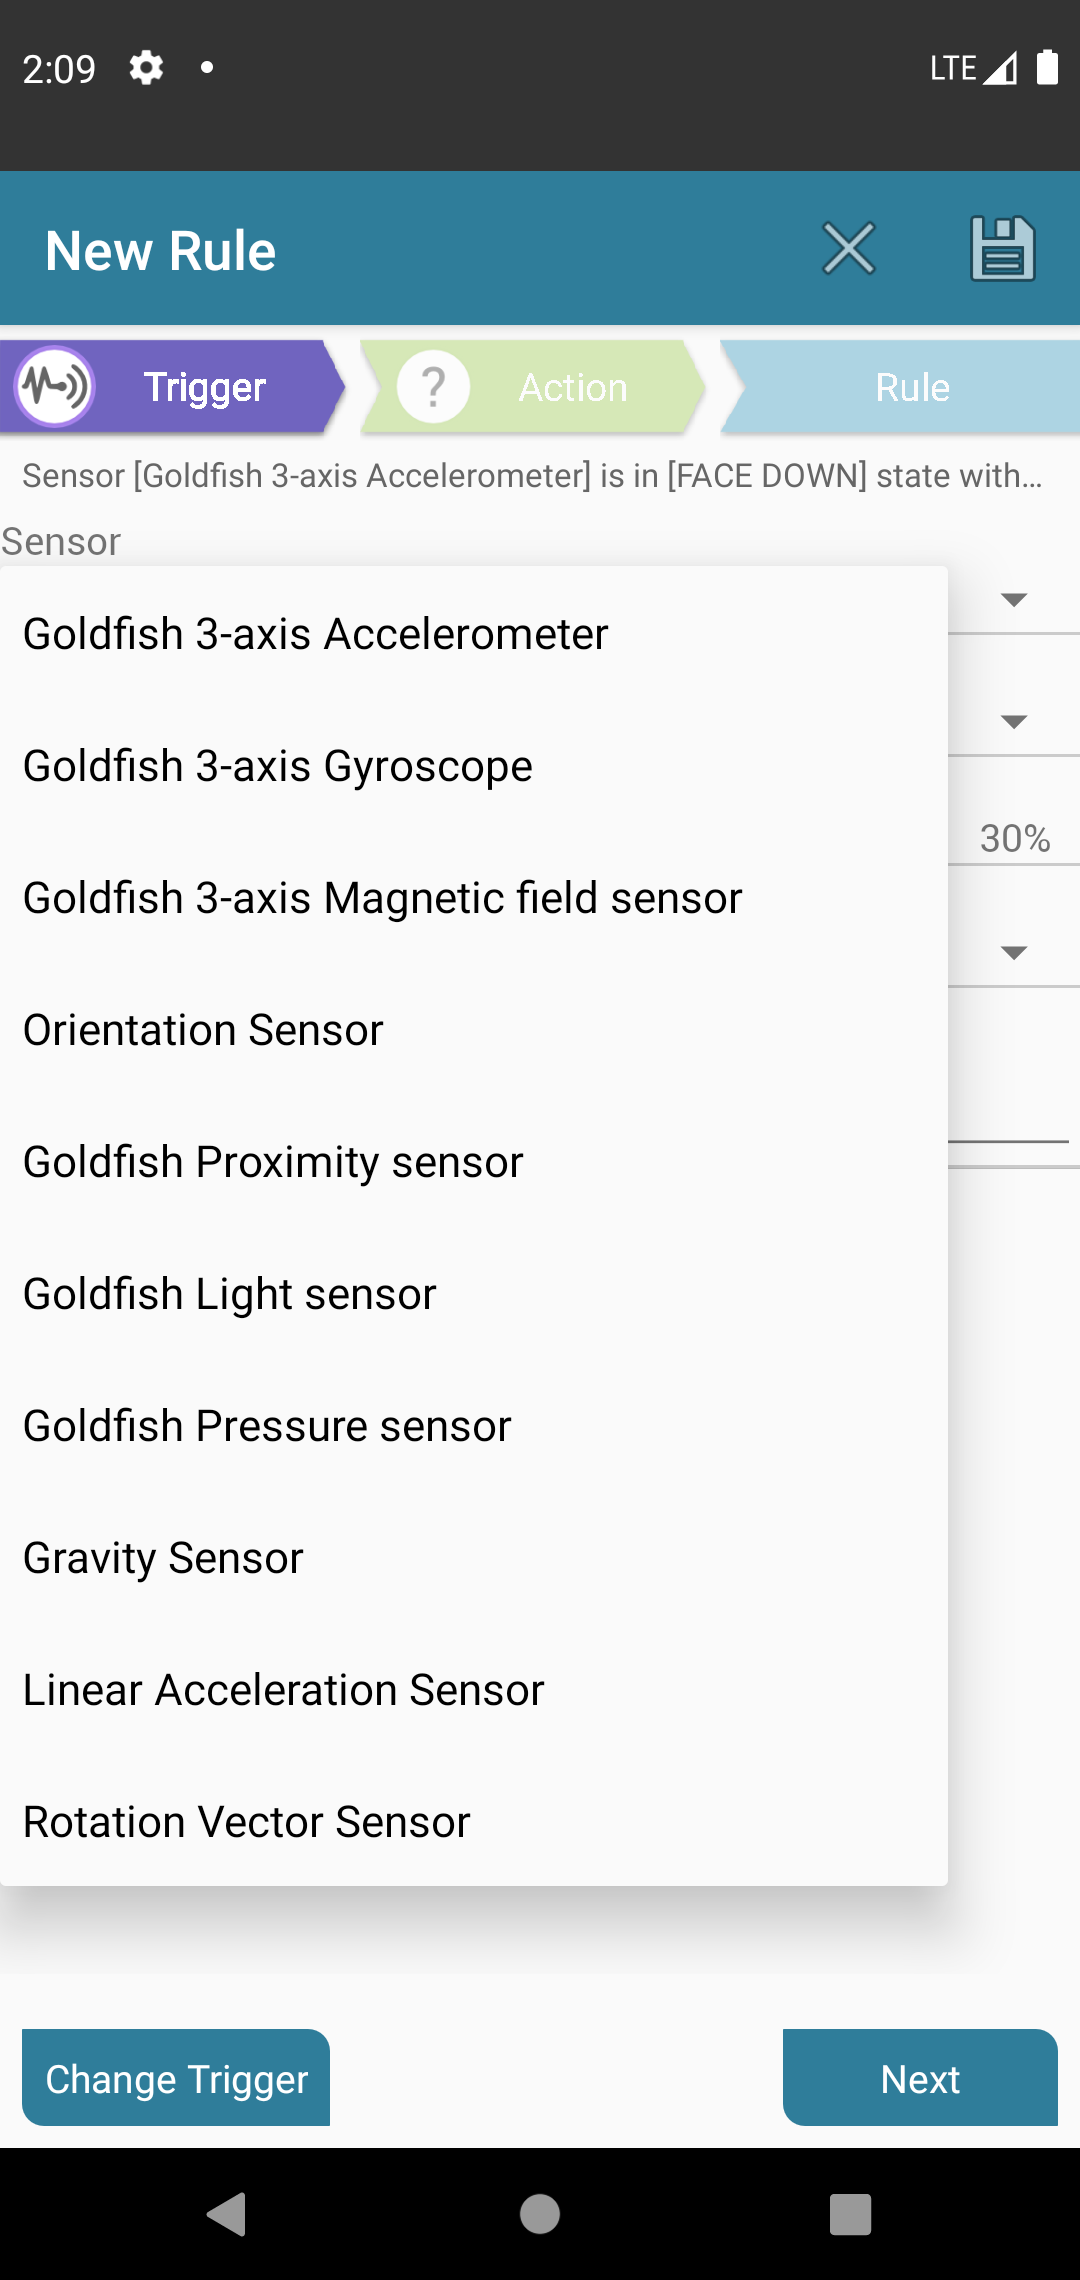
Sensor
Selection list of all sensors available on your device (name and type of each sensor). exact names of the sensors varies between devices so the list you'll see on your device will not be identical to the list in the following screenshot.
Please note that several users have reported that when using the Proximity Sensor, it might have a significant impact on your battery consumption
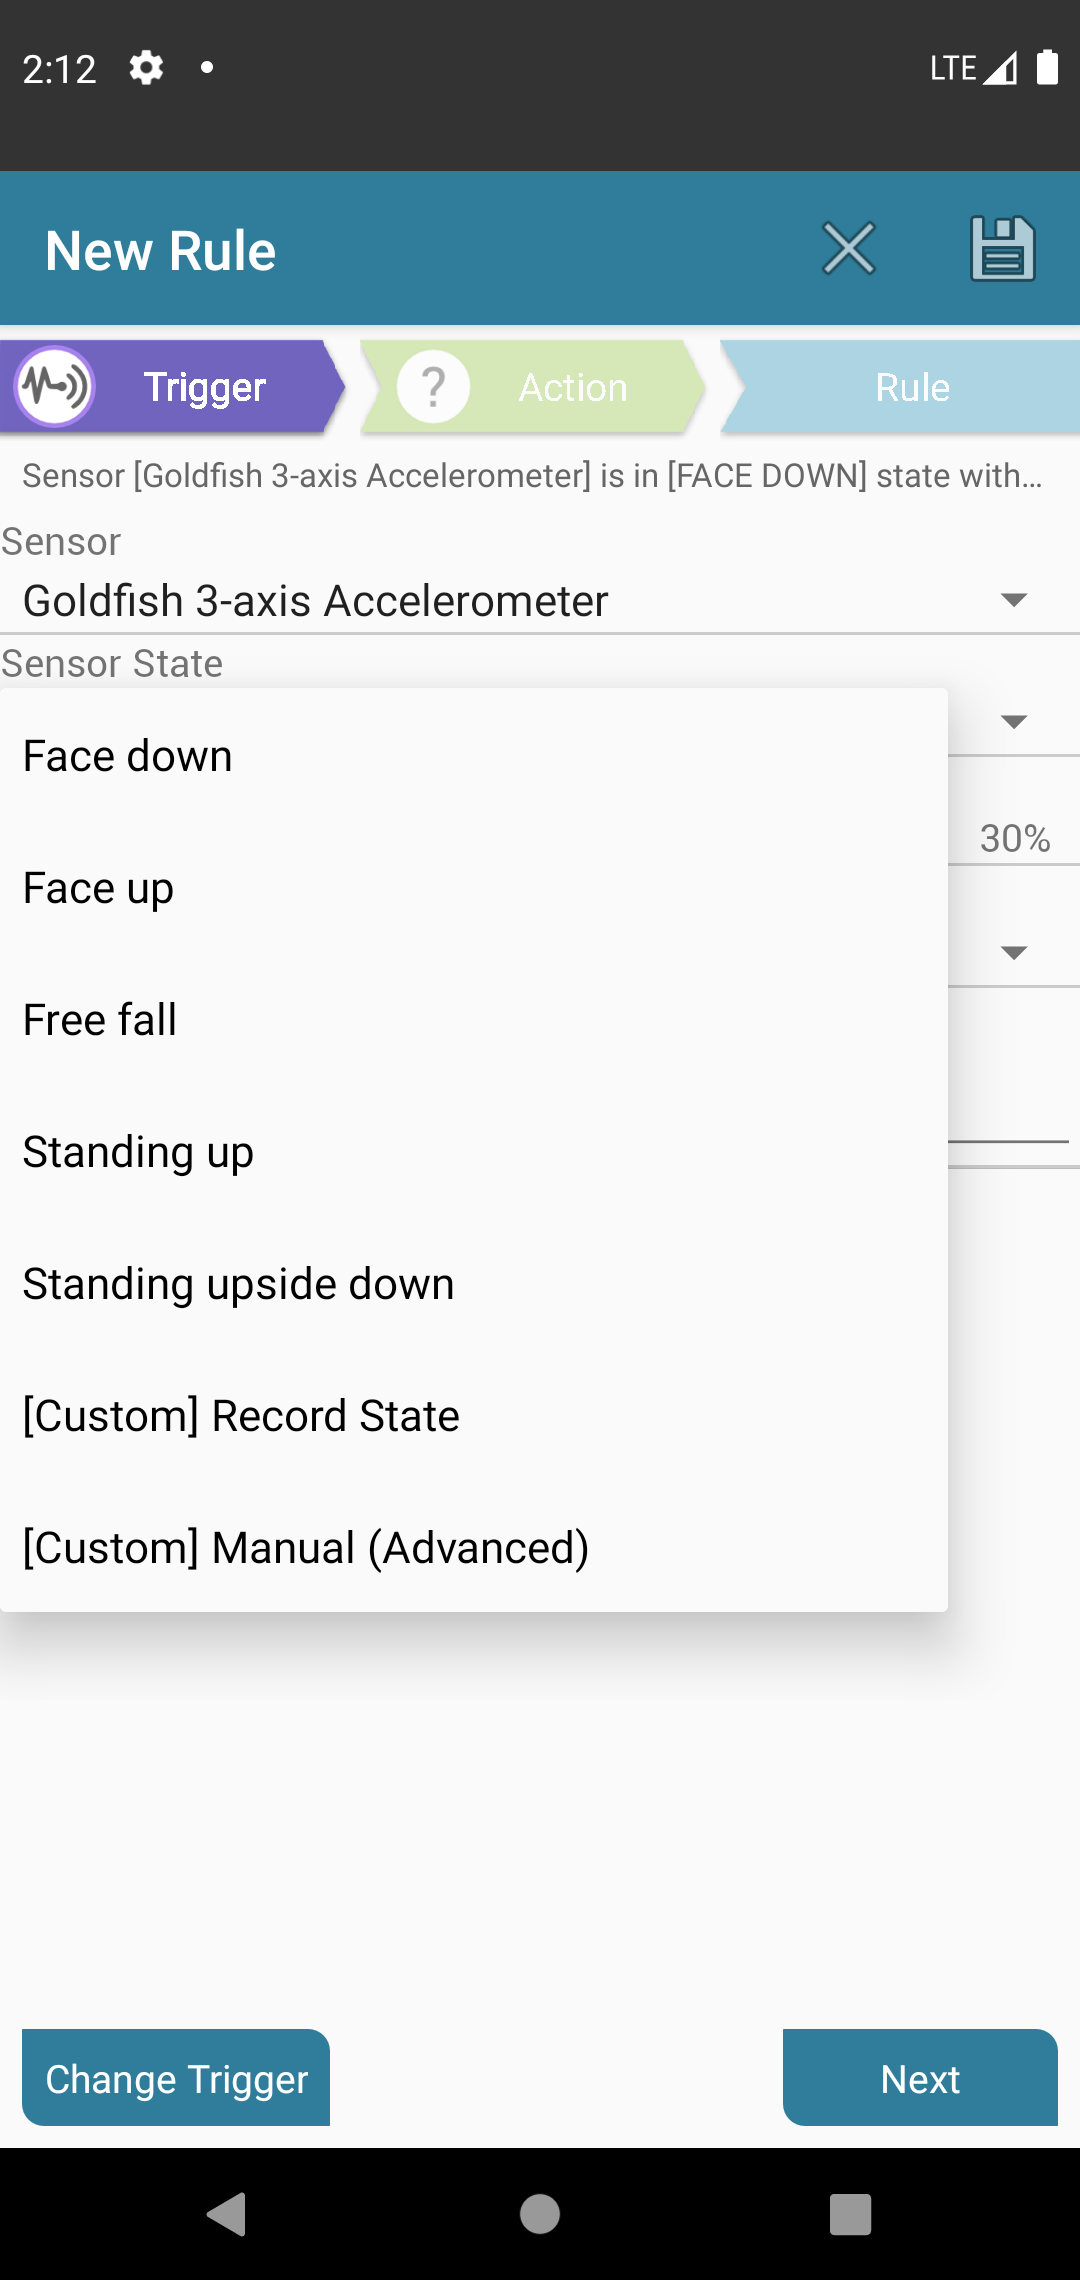
Sensor State
Selection list of presets available for each sensor or advanced customization state (Will be further explained). The following image shows a list of sensor state presets for the Accelerometer sensor.
Sensitivity
Since the exact values of each sensor can change by slight deviation, you can define how sensitive to these changes you want your trigger to be.
Sampling Rate
This field is used to define the rate in which the sensor will be sampled. In most cases "Normal" should be sufficient (other rates are Fast, Faster, Fastest). The exact rate depends on the specific sensor but approximate rates are as follows:
- Normal - ~4 Hz (4 samples in one second)
- Fast - ~9 Hz
- Faster - ~16 Hz
- Fastest - ~22Hz
Time required to set trigger
Number of seconds required to set off the trigger. To better explain what it means, let's assume we have selected the "Face Down" preset as shown in the image above, and set the "Time required to set trigger" to 1 second - in this case, only when the device is lying face down for at least 1 second, the trigger will launch.
Advanced customization
There are two advanced customization modes that can be used when using the "Sensor Trigger", record sensor state or manual sensor state.
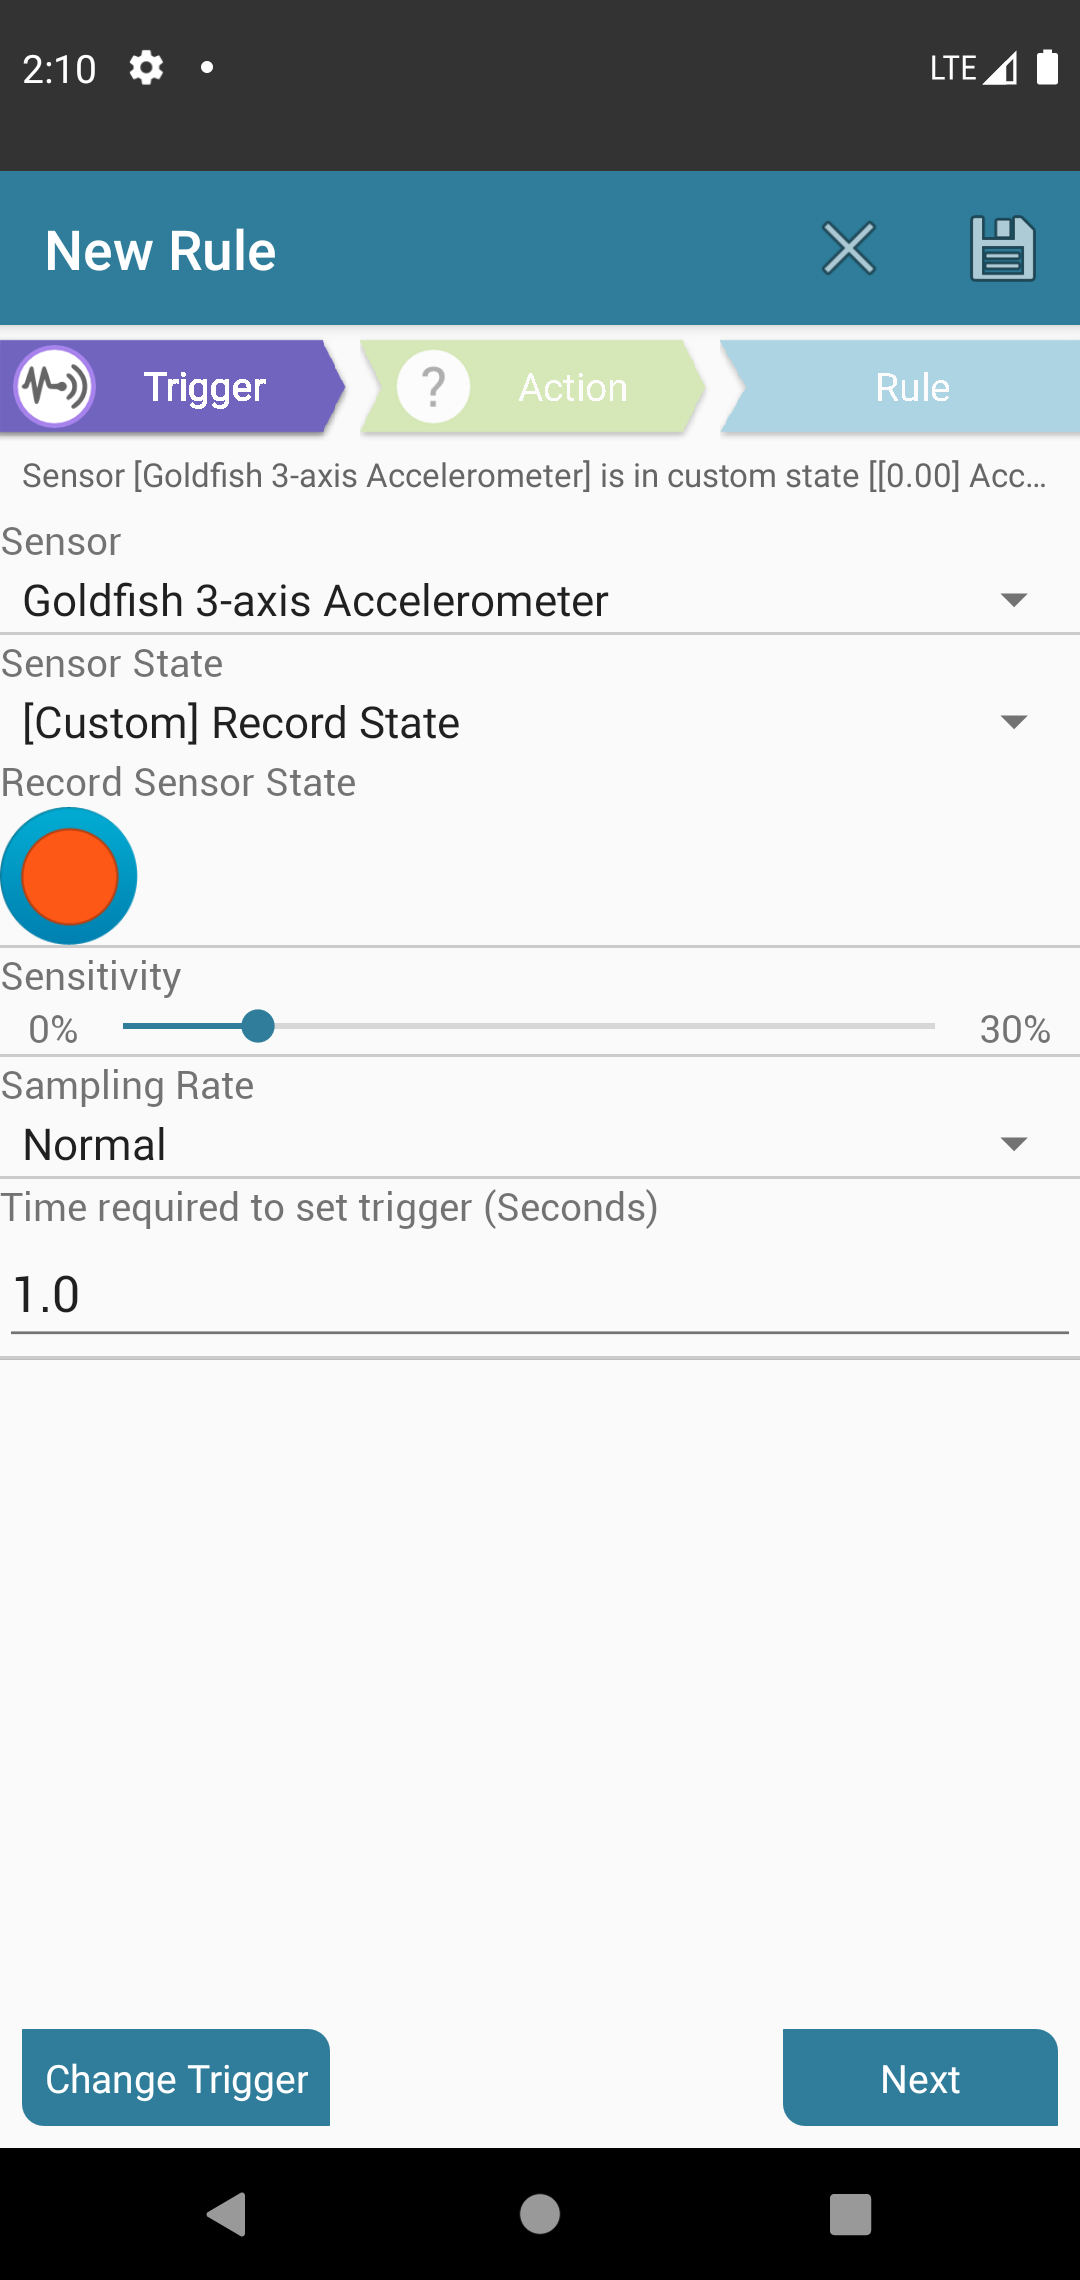
Record State
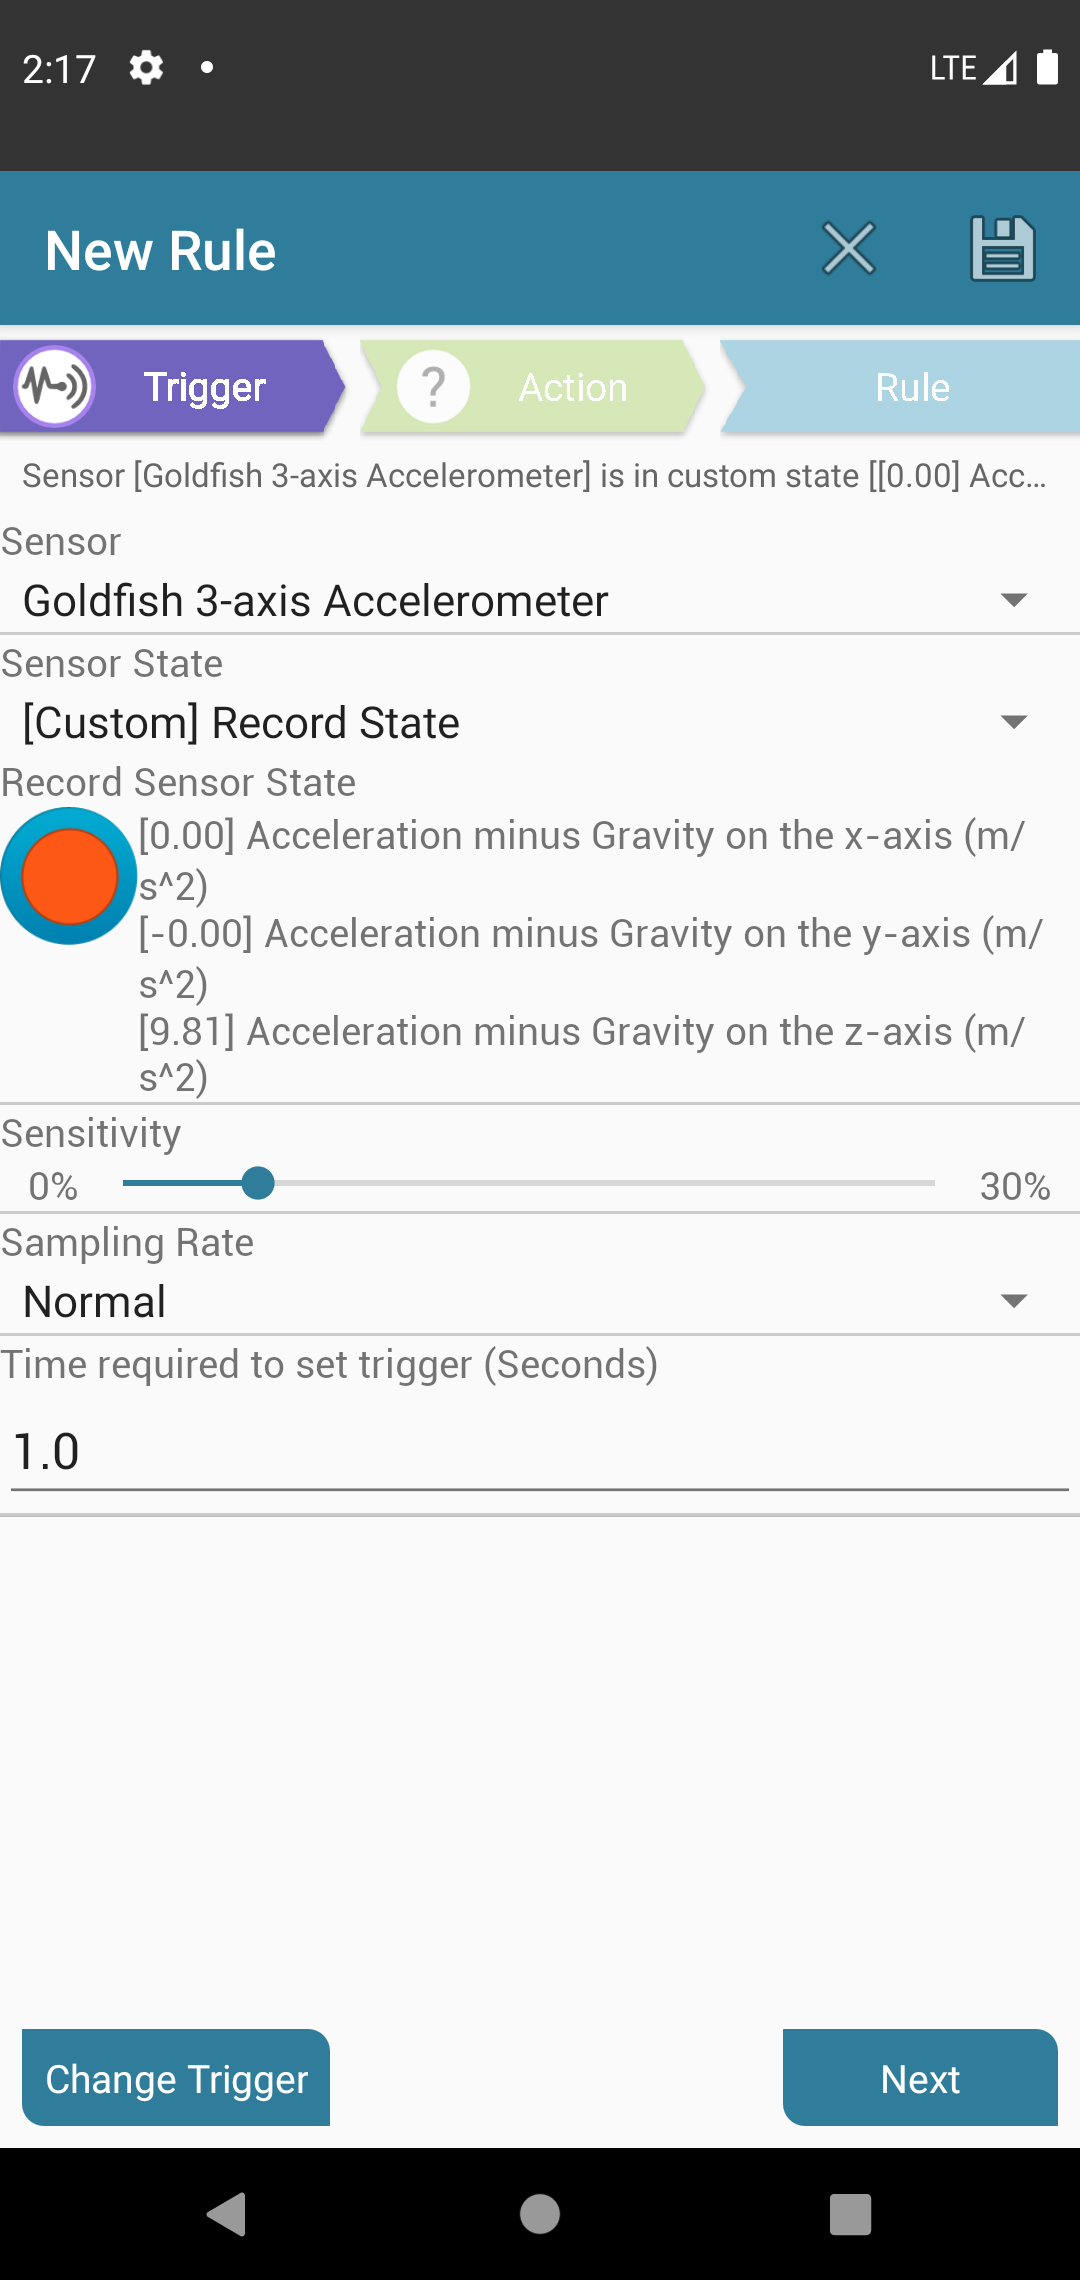
Almost all sensors have a special "Sensor State" called "[Custom] Record State". When this state is selected the edit screen shows a record button between the sensor state selection list and the sensitivity bar:
When this button is pressed, AutomateIt will record the current state of the selected sensor and will display detailed info on the recorded values:
In the image above the device was lying facing up on a table, but you can use this feature to record all kinds of sensor states that are not defined as presets.
Manual Sensor State
An even more advanced customization method. On this option instead of a record button, you'll be required to enter specific values that define a sensor state. In the following example we are using the proximity sensor and its value is the distance in centimeters from the sensor (some sensors only have a near/far indication):
To further understand what the exact values of each sensor mean, refer to the following guide.
